
Divi is a popular website builder that provides a lot of modules designed to help you easily customize your website. If you have a website up and running, most chances are you’ll need testimonials at some point.
As you probably know, Divi has a dedicated testimonial module integrated, but because of specific reasons, a dedicated testimonial plugin is, most of the time, the best option.
This post will teach you how to add testimonials to your website with the Divi Builder from Elegant Themes.
Table of contents
Testimonials are used by business owners to demonstrate the quality of their products or services and generate sales, and they are undeniably effective.
Many businesses that start with WordPress quickly discover that it does not offer a way to display testimonials by default. Here are some of the most common problems we’ve seen in various testimonial solutions:
1.❌You spend a lot on a package just to get a simple feature – Website owners will spend a lot of money for huge addon packages just to get a simple feature out of it. Especially if you get a page builder, you might get a package filled with addons on the side that have nothing to do with testimonials.
2.❌ No option to import testimonials from different platforms – If you have testimonials from other platforms such as Yelp, Google, or Facebook and you don’t make use of them, you miss out on many opportunities. Some testimonial solutions or plugins won’t automatically import them, and you are stuck to manually adding each testimonial from those platforms.
3.❌ No option to load testimonials while you scroll – This is a common issue where the business has a lot of testimonials to display, and they don’t utilize a form of infinite scrolling. This issue causes the website to have astronomical loading times and will eventually scare the customers away since nowadays people have less and less patience.
How to add testimonials with Divi
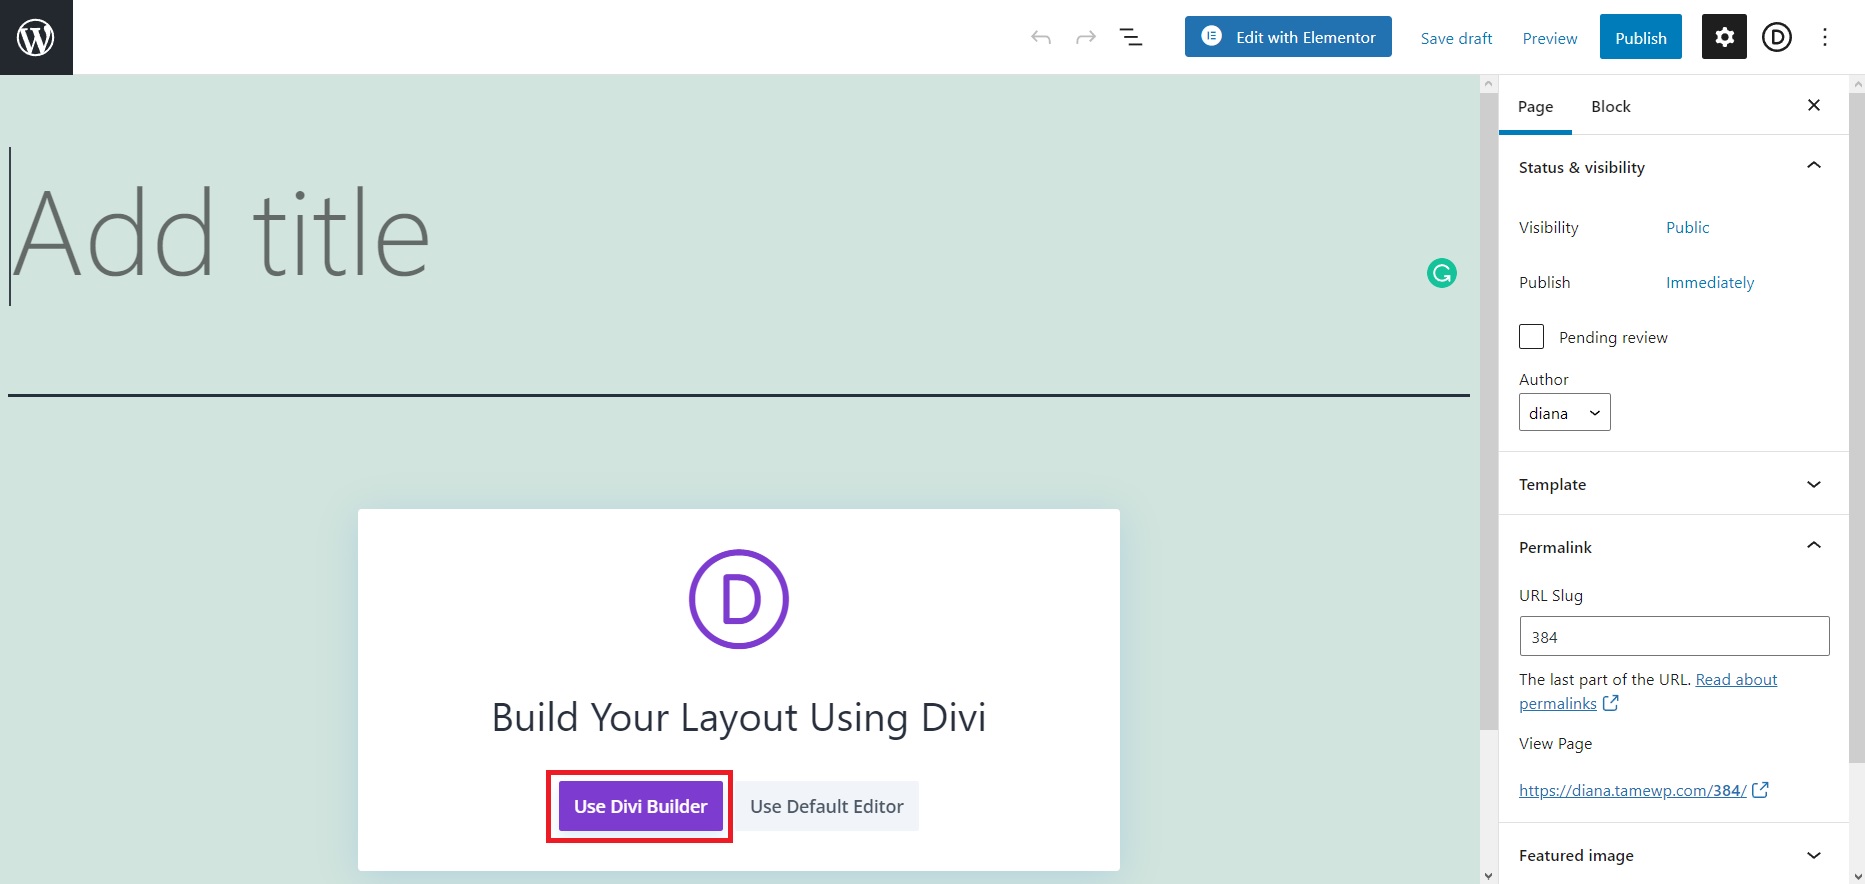
Divi is a pretty easy-to-use and straightforward page builder. Once you installed it on your WordPress website, go ahead and create a new page. As soon as it pops up, you will notice some buttons in the middle of the screen. Go ahead and click Use Divi Builder to start building up your testimonial page.
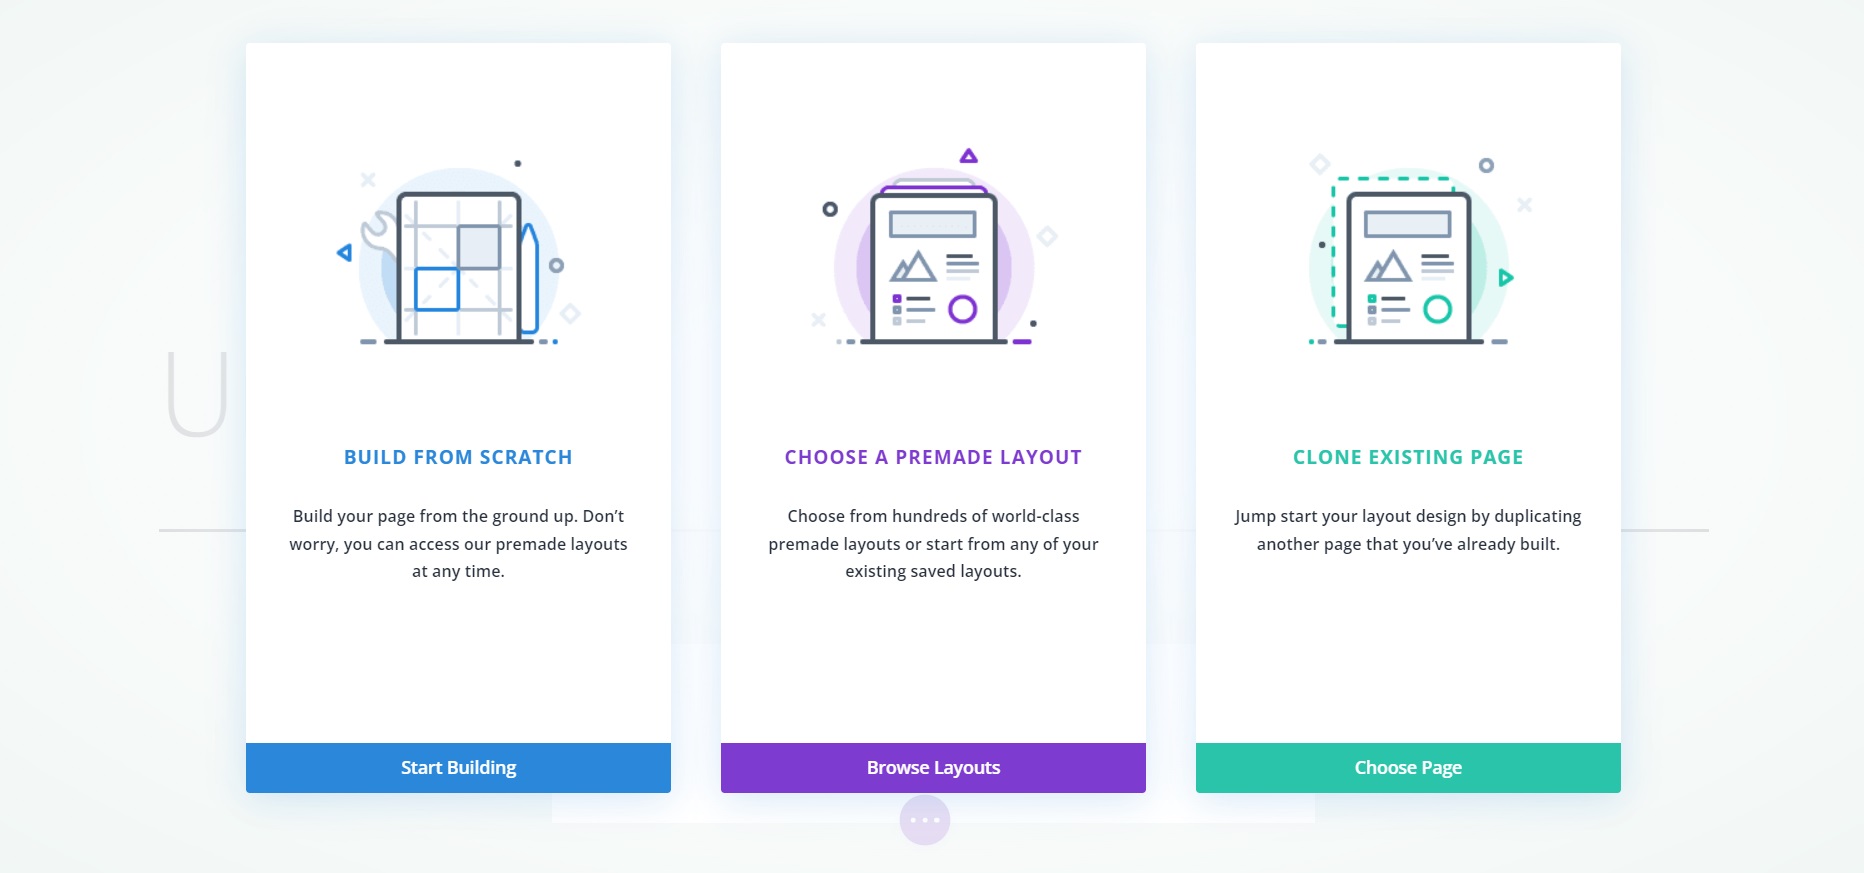
Once you do that, you will be redirected to a layout of 3 possible options to choose from. You either Build From Scratch, Choose A Premade Layout, or Clone Existing Page. For the purpose of this article, we will create a simple testimonial page from scratch.
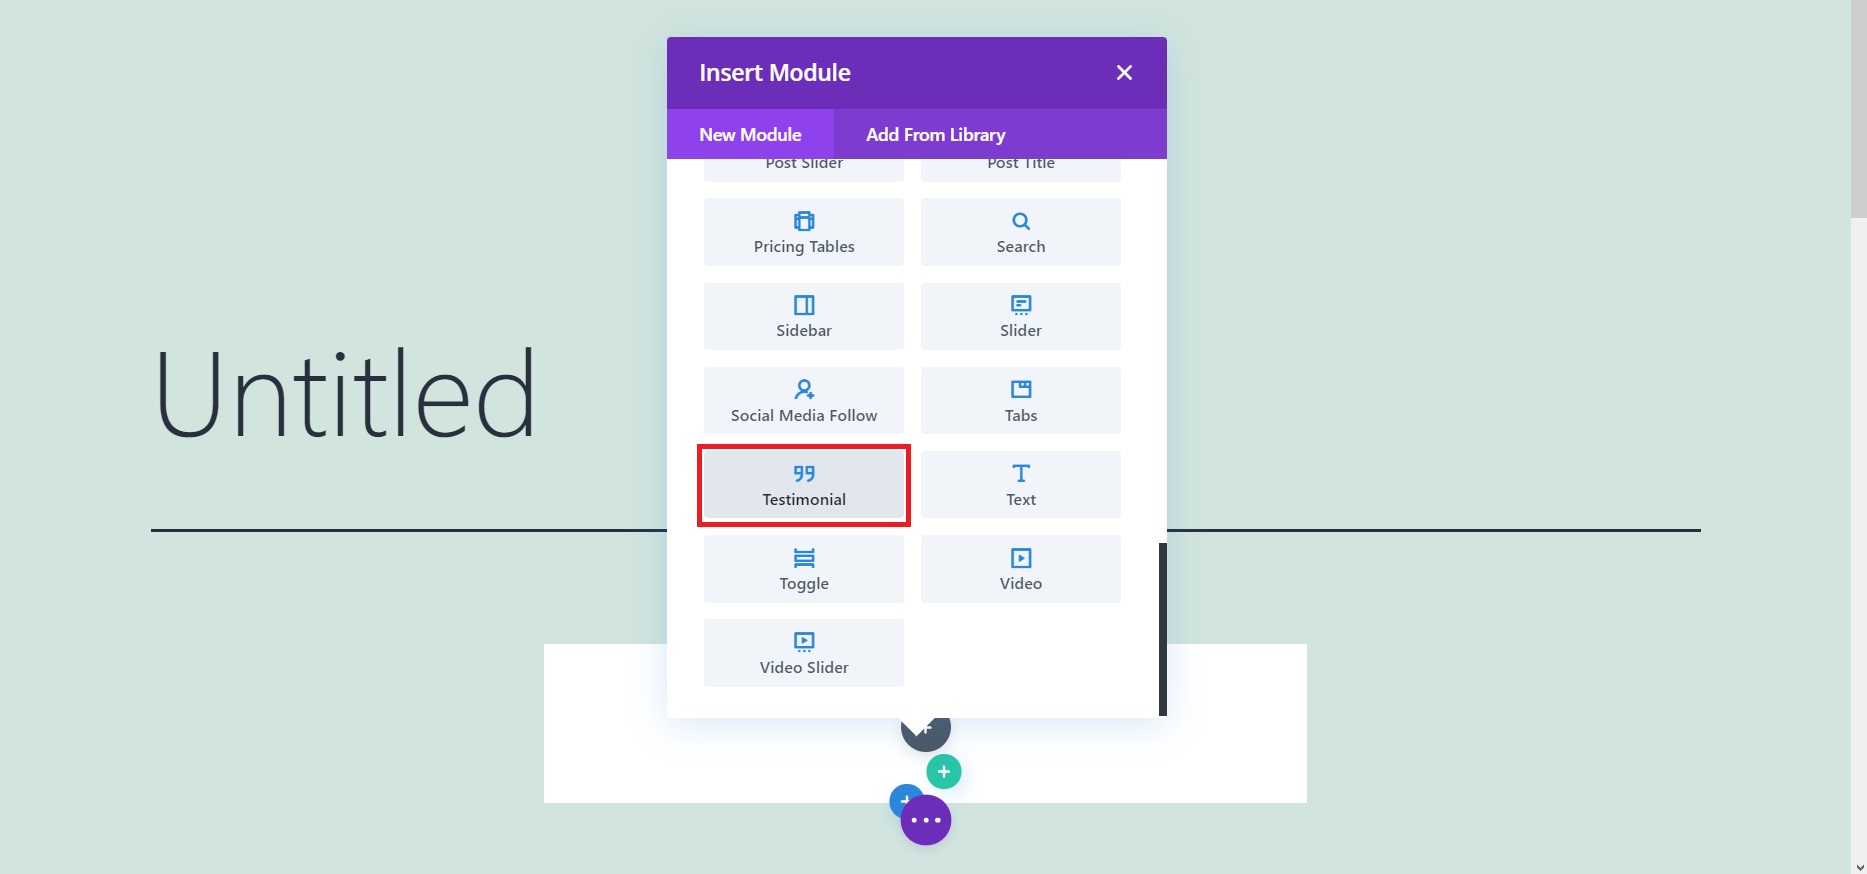
After that, you will need to insert the testimonial module.
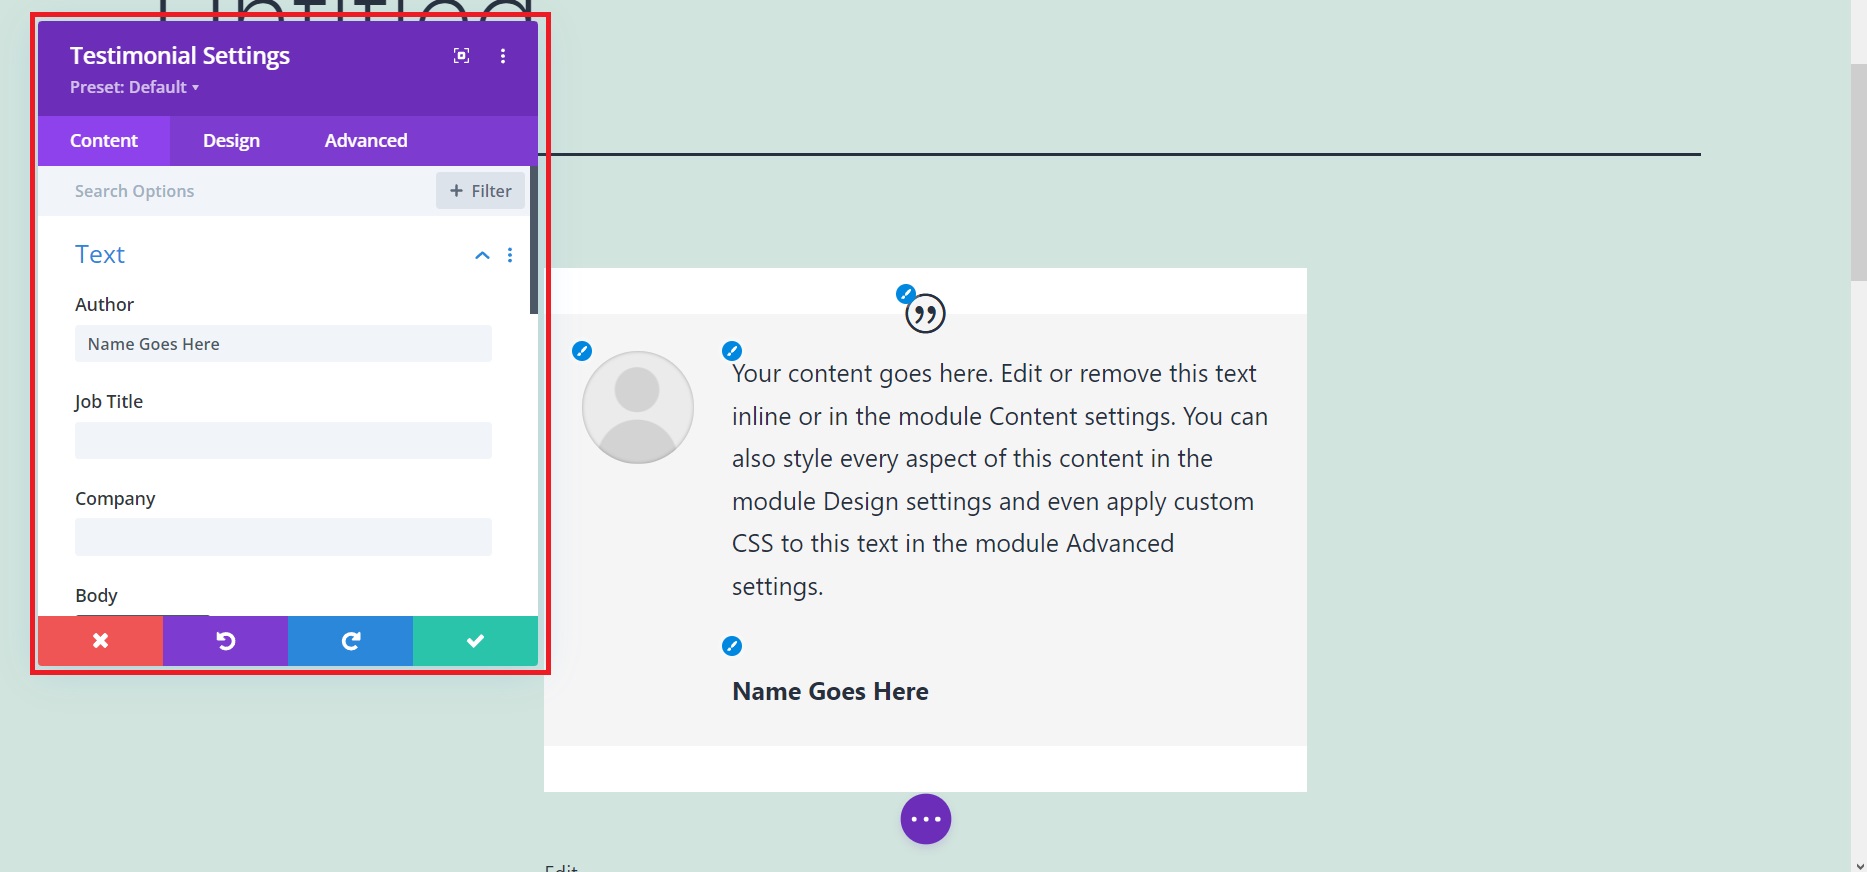
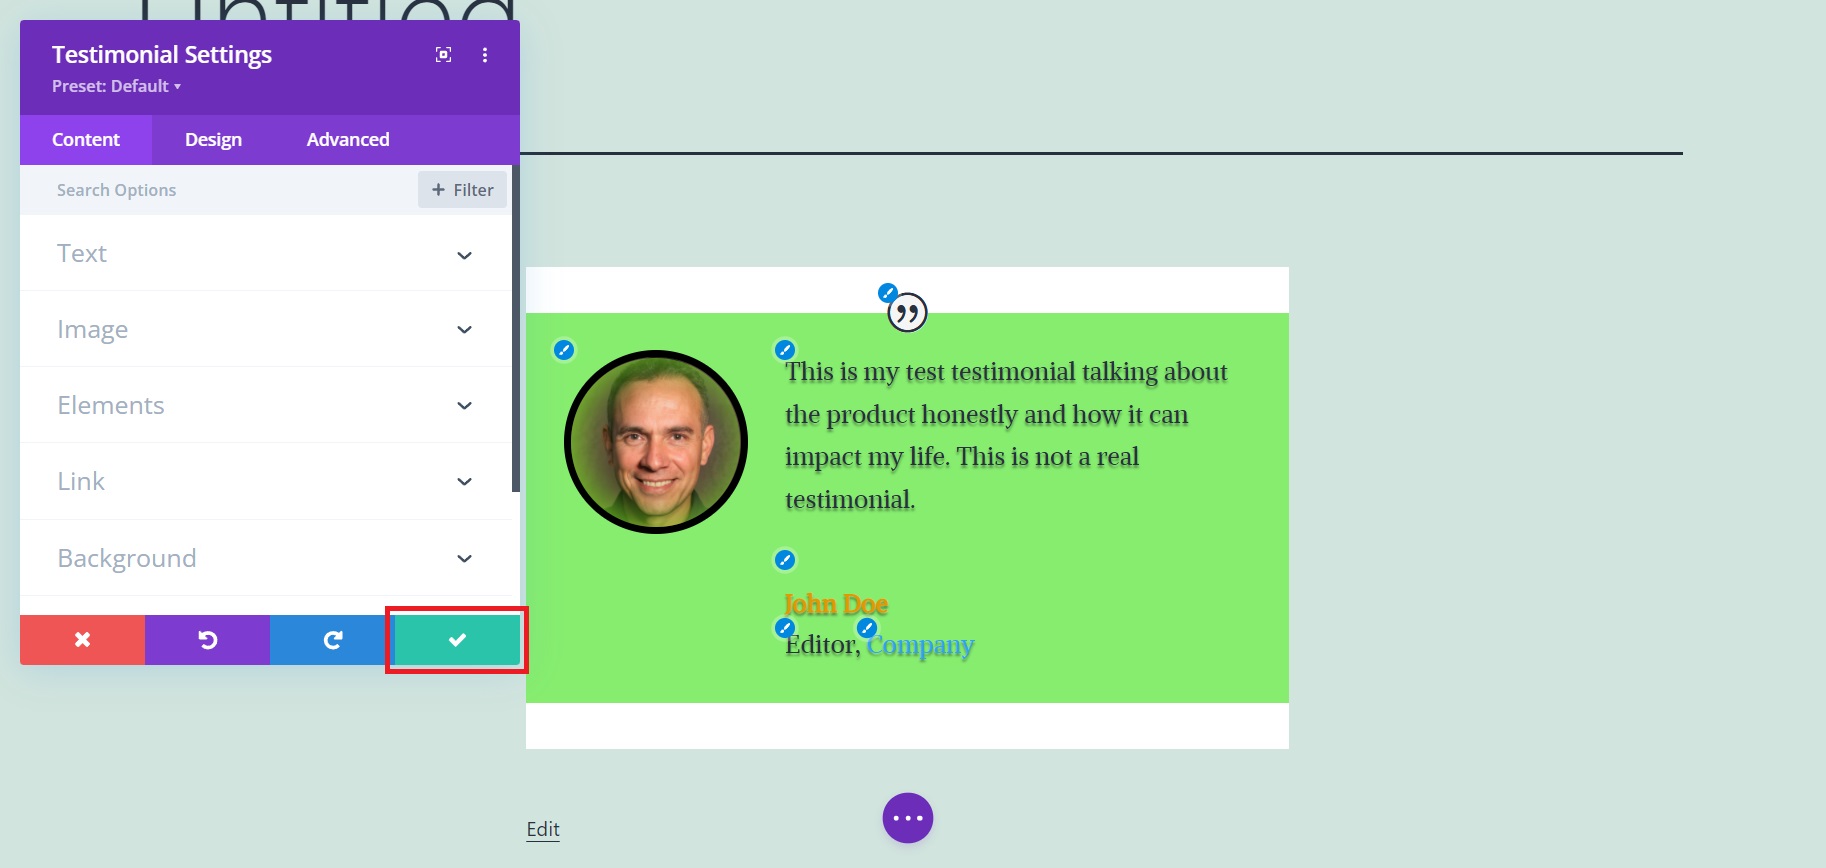
Once you select that, a new pop-up window will appear as well as a testimonial template. This is the moment where you can customize your testimonial. You can edit info such as name, company, job title, testimonial text, featured image, links, background, show/hide quote icon. On top of that, you can also play around with image size, border, shadow, contrast, saturation, hue, opacity, blur, etc. There are so many options to choose from.
Go ahead and play around with the settings until you figure out what you like for your website.
We played around with it just a bit for the sake of this article but there are many things you can do with the design part. You can also make use of the search bar to find any specific setting instead of clicking everything.

Once you are happy with the results, make sure to click the Save Changes button.
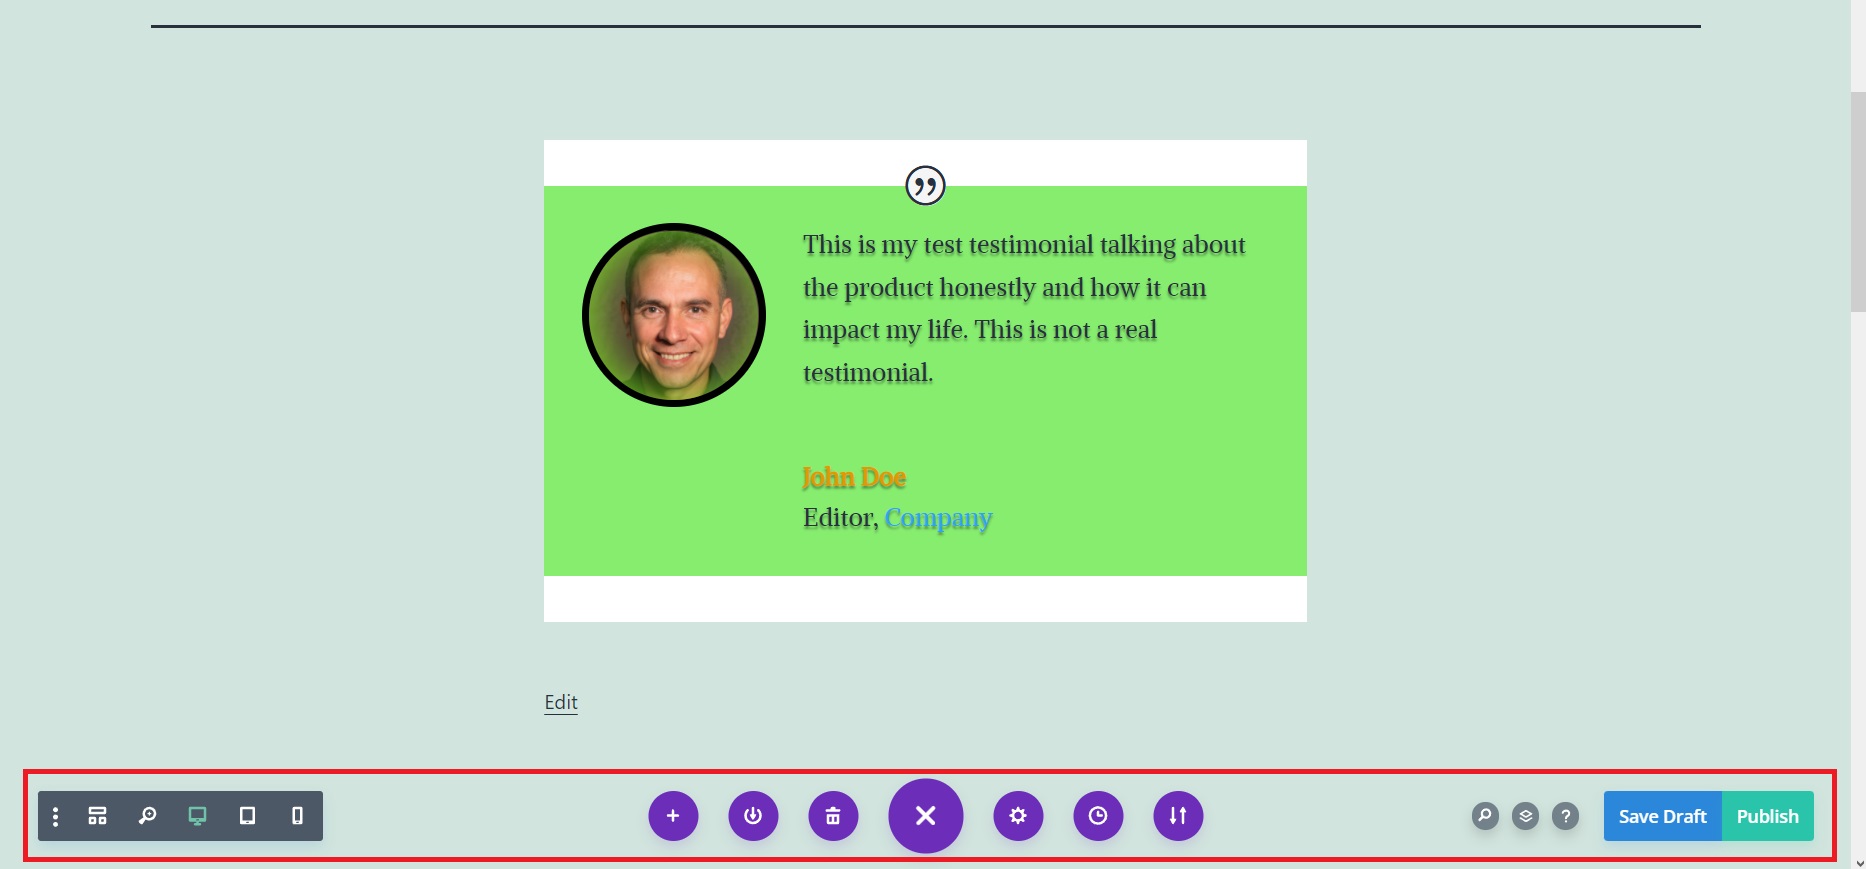
After that, if you click on the big purple dot with three smaller dots, you will have new options popping up. There you can choose to Save Draft or Publish the testimonial page immediately among other page options. To see your testimonial page right away, hit Publish.
But that’s about it when it comes to Divi’s testimonial module. It’s only one way to include them on your website and that’s manually adding testimonials one by one. This can be very time-consuming and prone to a lot of human errors, typos, etc. But if your company is small and you don’t have a lot of testimonials to add, Divi can be a good temporary solution for you.
Divi is limited with its testimonials because they are contained within their own modules. Because you have to configure each module individually, changing the design of the modules is tough. It also just shows one testimonial. If you want to create a testimonial slider, you have to use a third-party plugin for which you have to pay extra.
How to add your testimonials with Strong Testimonials
Strong Testimonials comes with a free version that you can find in the WordPress repository. You can make use of the free version, as well as our premium one.
Before you get started, you might want to read this guide on installing Strong Testimonials.
After you install and activate Strong Testimonials, you’ll find it in the dashboard (left sidebar), named “Testimonials”.
Step 1: Create the testimonials
To begin with, you have to first add your customer’s testimonials, using Strong Testimonials. We also have a beginner’s guide on how to do that.
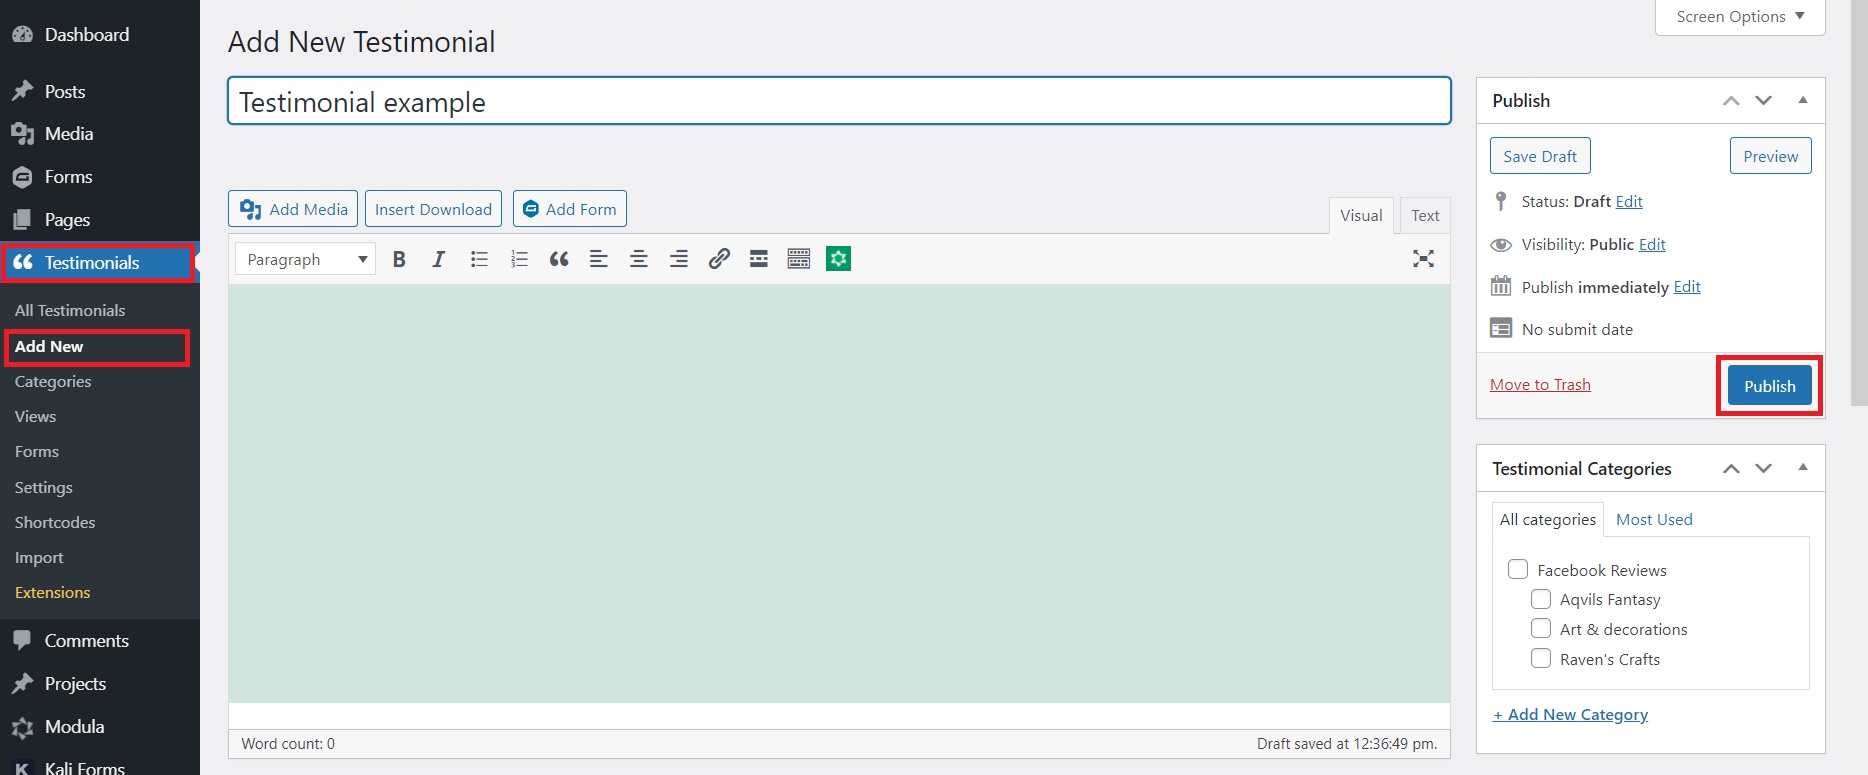
You can add the testimonials just like you create a WordPress post. Go to the left sidebar and click on Testimonials – Add New. Fill in the required fields. You can also add a featured image if you have one and the customer agrees to let you use it. To spice it up a bit, you can also add our star rating functionality.
When you finish filling in all the details, hit the Publish button on the right:
While still on this topic, you might want to know that you can easily import testimonials from other platforms. You can check out our easy-to-follow guides for more information on how to import testimonials from Google, Yelp, or Facebook.
Step 2: Choose the display type of your testimonial
Now that you added the customer testimonials, it is time to work on their view (how it will appear on your website). You can either create a simple, static page for your testimonials and display them in a list/grid, etc. or create a testimonial slider. We’ll show you examples of both.
Create a testimonial list or grid using Strong Testimonial
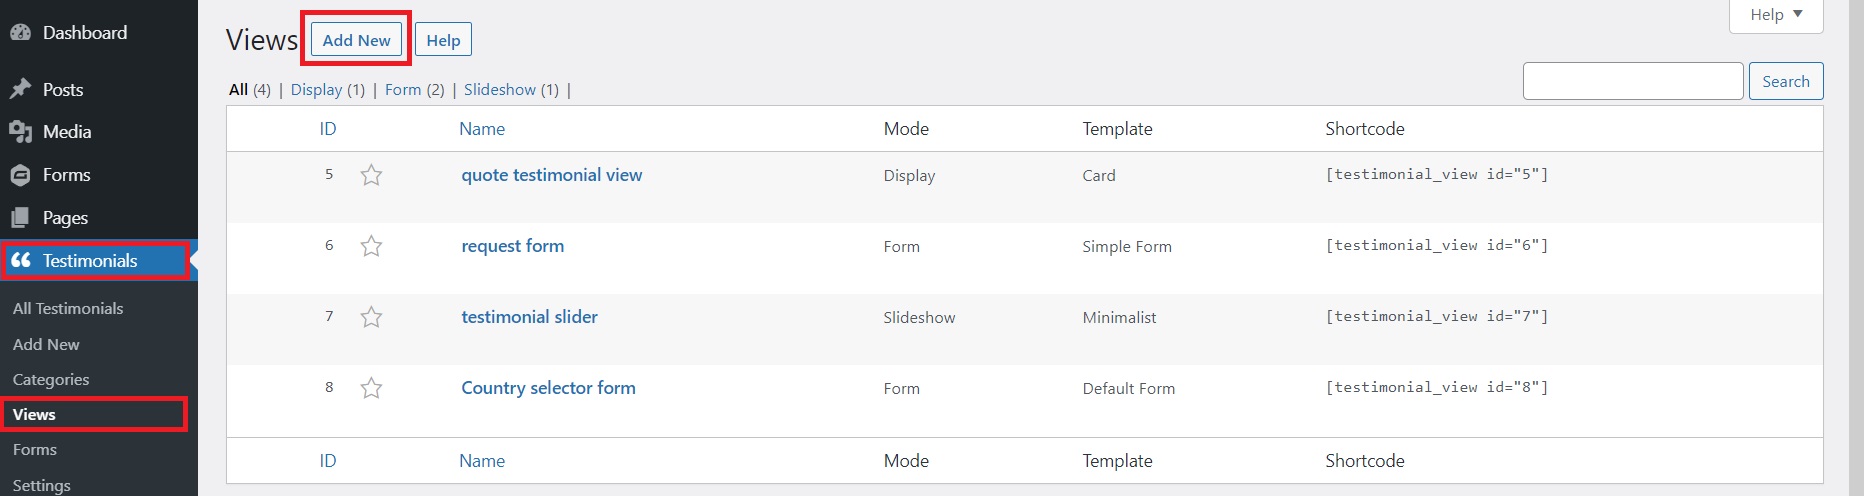
The first step is to go to your dashboard and from Testimonials, this time you click on Views and Add New:
After you click on Add New, a window will open with all the available settings for your testimonial view.
Check the Display option on top to showcase your testimonials in a list or grid. Once you do that, you have to scroll down through all the available settings and customize the view the way you like it.
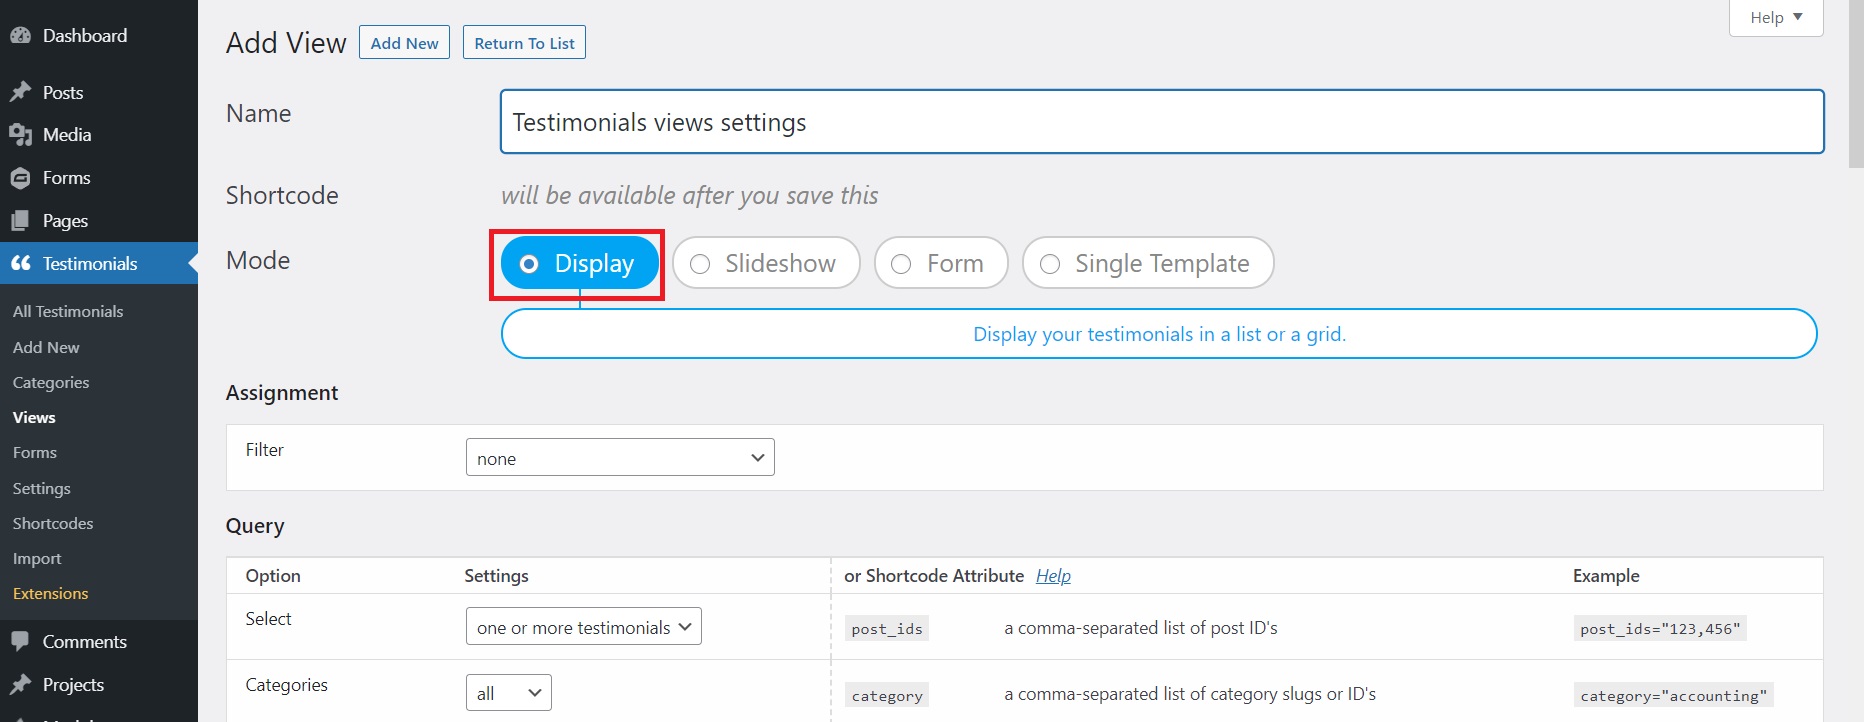
There are 11 templates to choose from: default, card, elegant, minimalist, side, table, modern, bold, small widget, simple and unstyled (this last one is for those who want to use CSS). Some of these templates allow you to change the background color of the testimonials, quote color, or rating color; others let you change the image position. It all depends on what you need.
There are also 4 layouts available: normal, masonry, columns, and grid.
You also have settings for the size of your featured image, for the background, the font color, custom fields (if you want to add details such as the client’s full name, company name, and website, etc.).
While here, once you scroll down, you will see the Extra section. There, if you tick the Pagination box, you will have a few options to choose from. This section represents the Infinite Scroll addon. The addon allows you to load and display testimonials on the page as you scroll down without overloading the entire page and making it unresponsive. It would be a great idea to make use of this option to improve your user experience.
Next, when you are done with all the settings, scroll down to the bottom of the page and click on the Save Changes button. A shortcode will be generated after you do that and you can find it if you scroll back up at the top of the page:
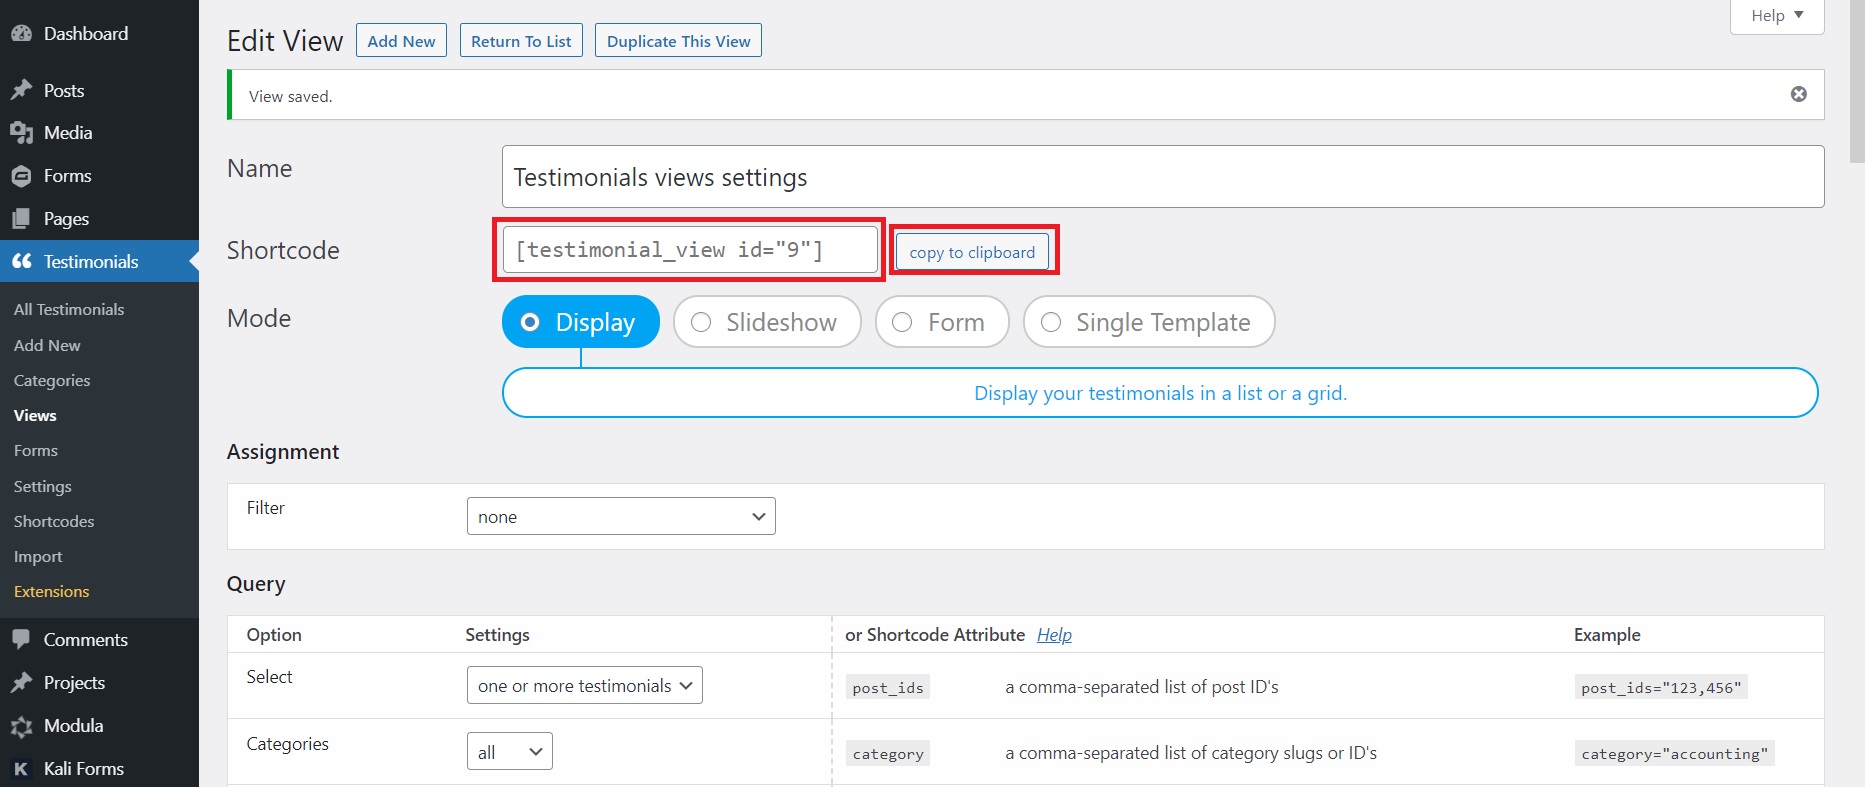
You have to copy that shortcode later to paste it in Divi but will get to that step later. If you don’t want to look for it again, you can copy it in a text file or something now, to save you time.
That’s it for your testimonial grid or list! Let’s move on!
Create a testimonial slider using Strong Testimonials
Next, we’ll show you how to create a Divi testimonial slider with this plugin. The steps are pretty similar. You open the Views in Strong Testimonials and click on Add New. Only in this case, you check the second option, namely Slideshow:
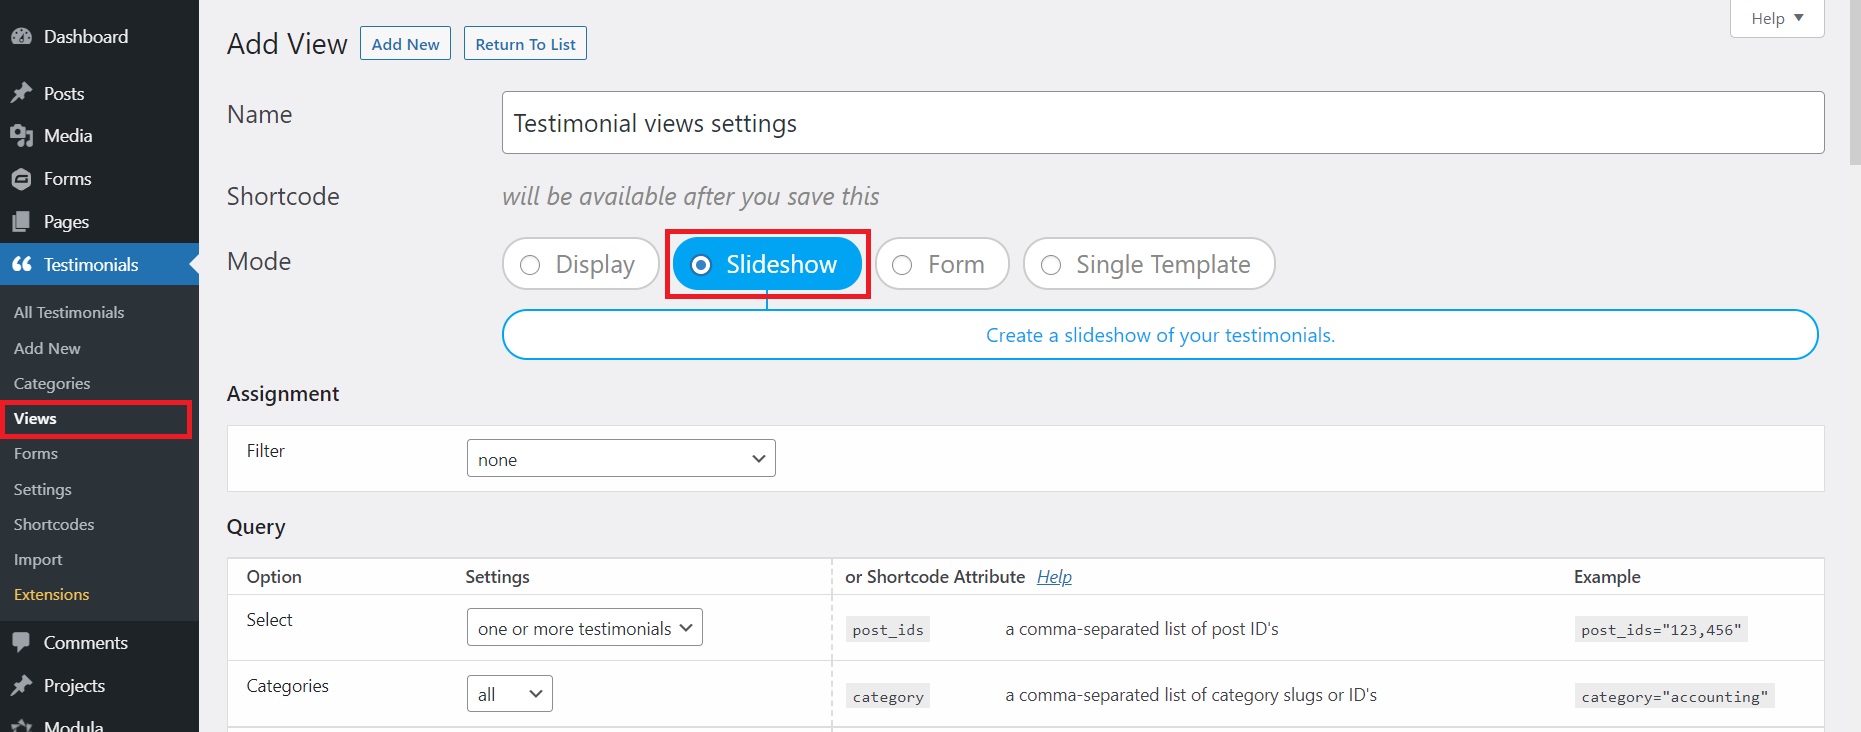
Similarly, you have multiple fields to fill and settings to adjust for your Divi slider. The same 11 templates are also available for the slideshow. You also have settings for the transition time, transition type, and more.
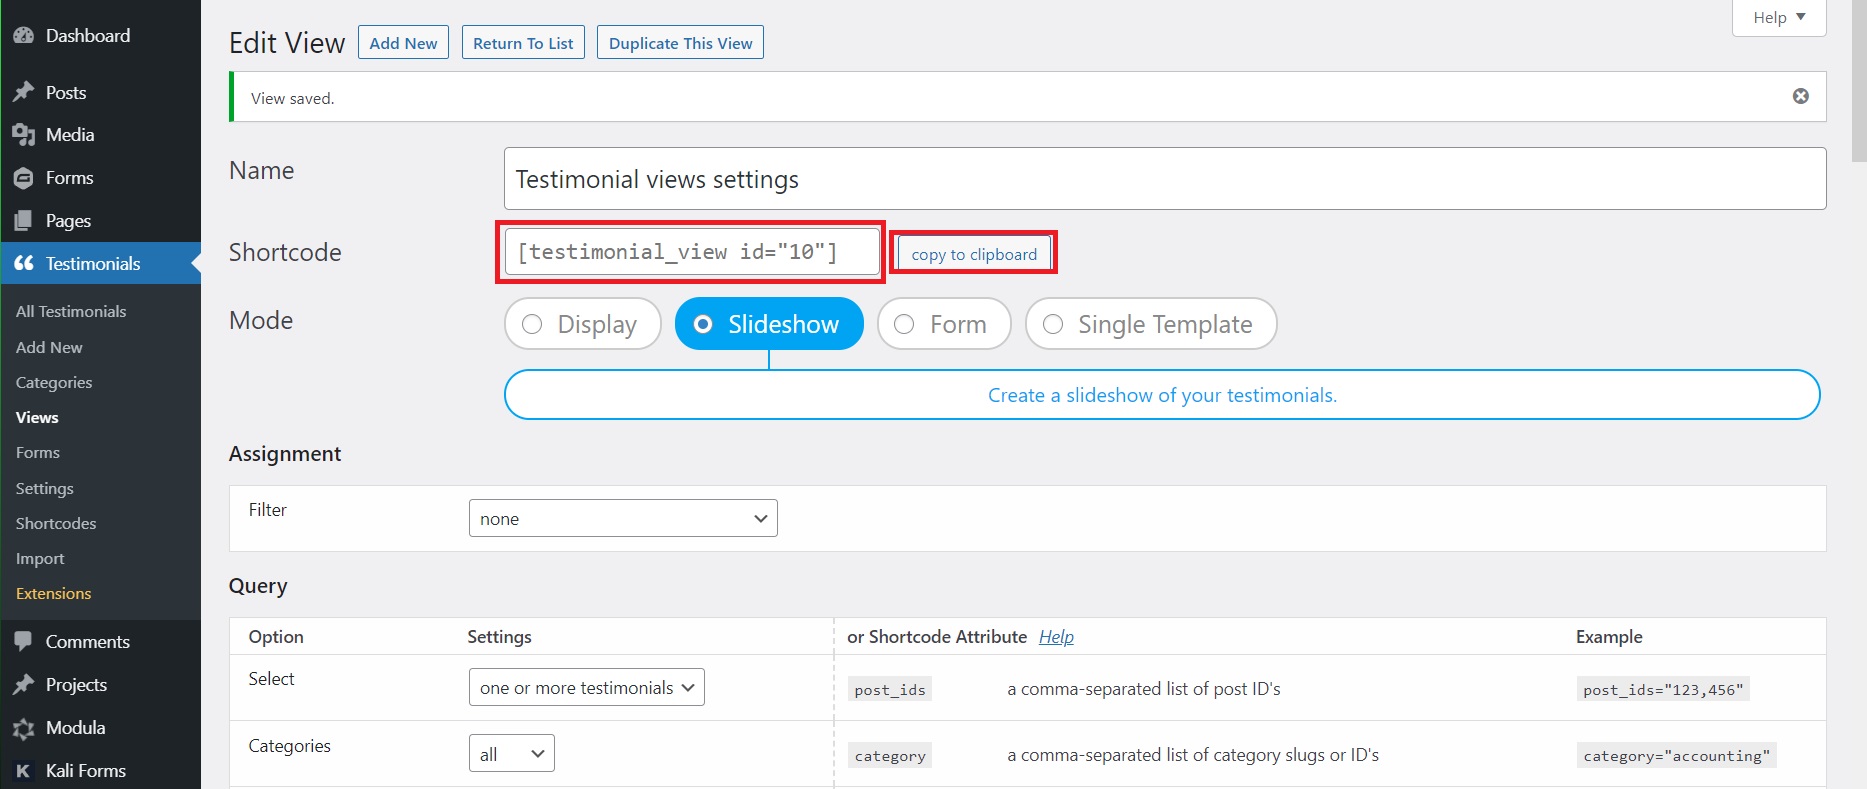
Check all of them and create the testimonial slider view you want. When you are done, click the Save Changes button at the bottom of the page.
A shortcode will be generated in this case as well and you can copy it now or later from Testimonials – Views:
🔎 For more information on getting started with Strong Testimonials, head over to our knowledge base.
Step 3: How to use Strong Testimonials with Divi to display your testimonials
Now that your testimonial view is created (list/grid or slider), it is time to display the testimonials on your page, using the Divi builder.
Remember the shortcode that was generated when you created your view? All you have to do is copy it and paste it to the Divi page where you want to display your testimonials.
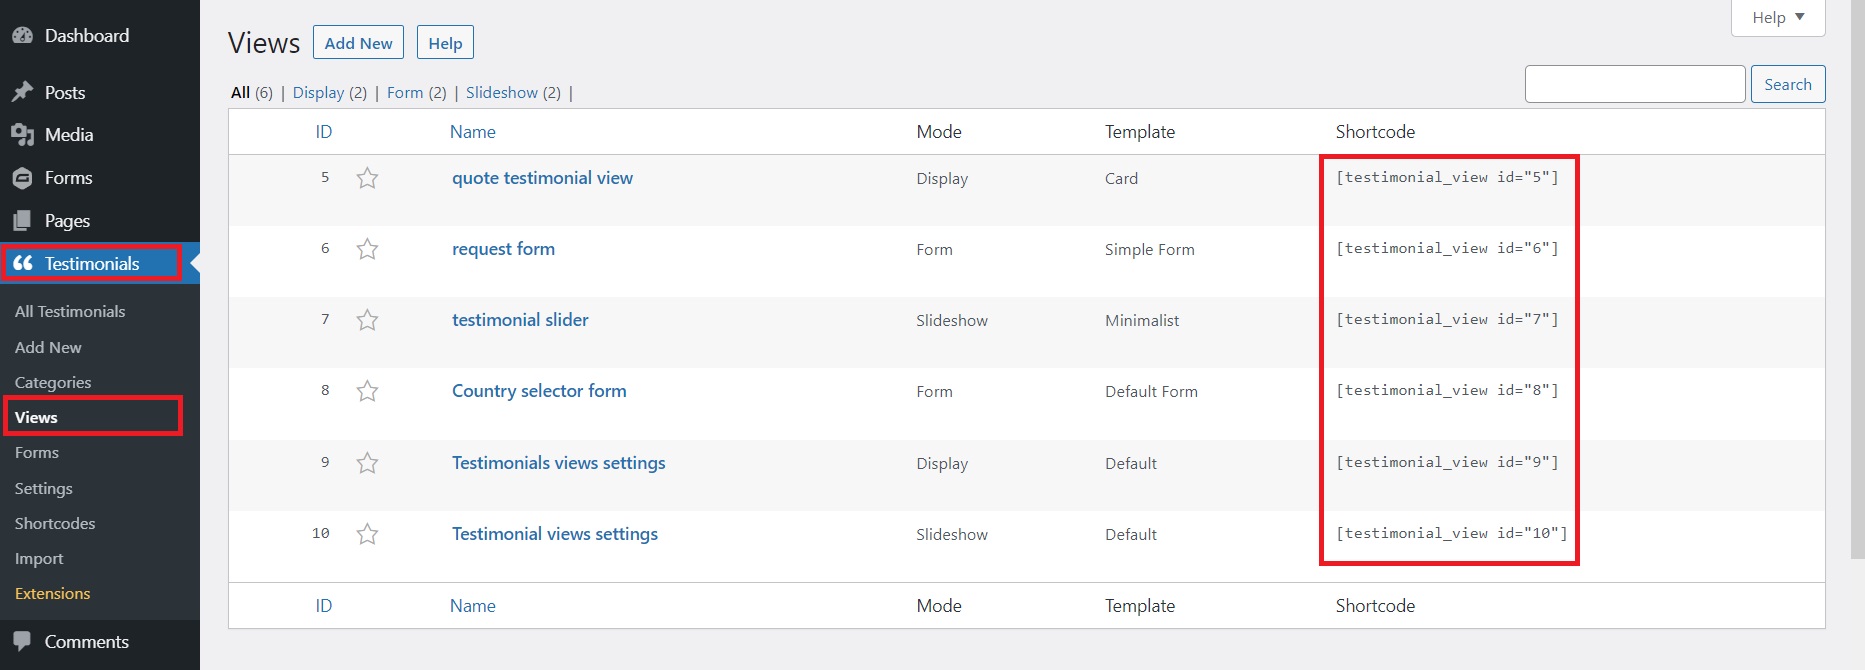
If you didn’t copy the shortcode when it was generated, go back now to your Dashboard – Testimonials – Views. Find the view that you want (based on the name you gave it) and copy its shortcode to the right. Here are some examples of shortcodes for our testimonial views:
Copy the shortcode of the testimonial view you created earlier. Next, go to the page you want to display the testimonials on. From there choose Use Divi Builder.
Add the shortcode in the Divi Code module
You can also add the testimonial shortcode using a simple module in Divi: the Code module. You can find it in the Divi modules:
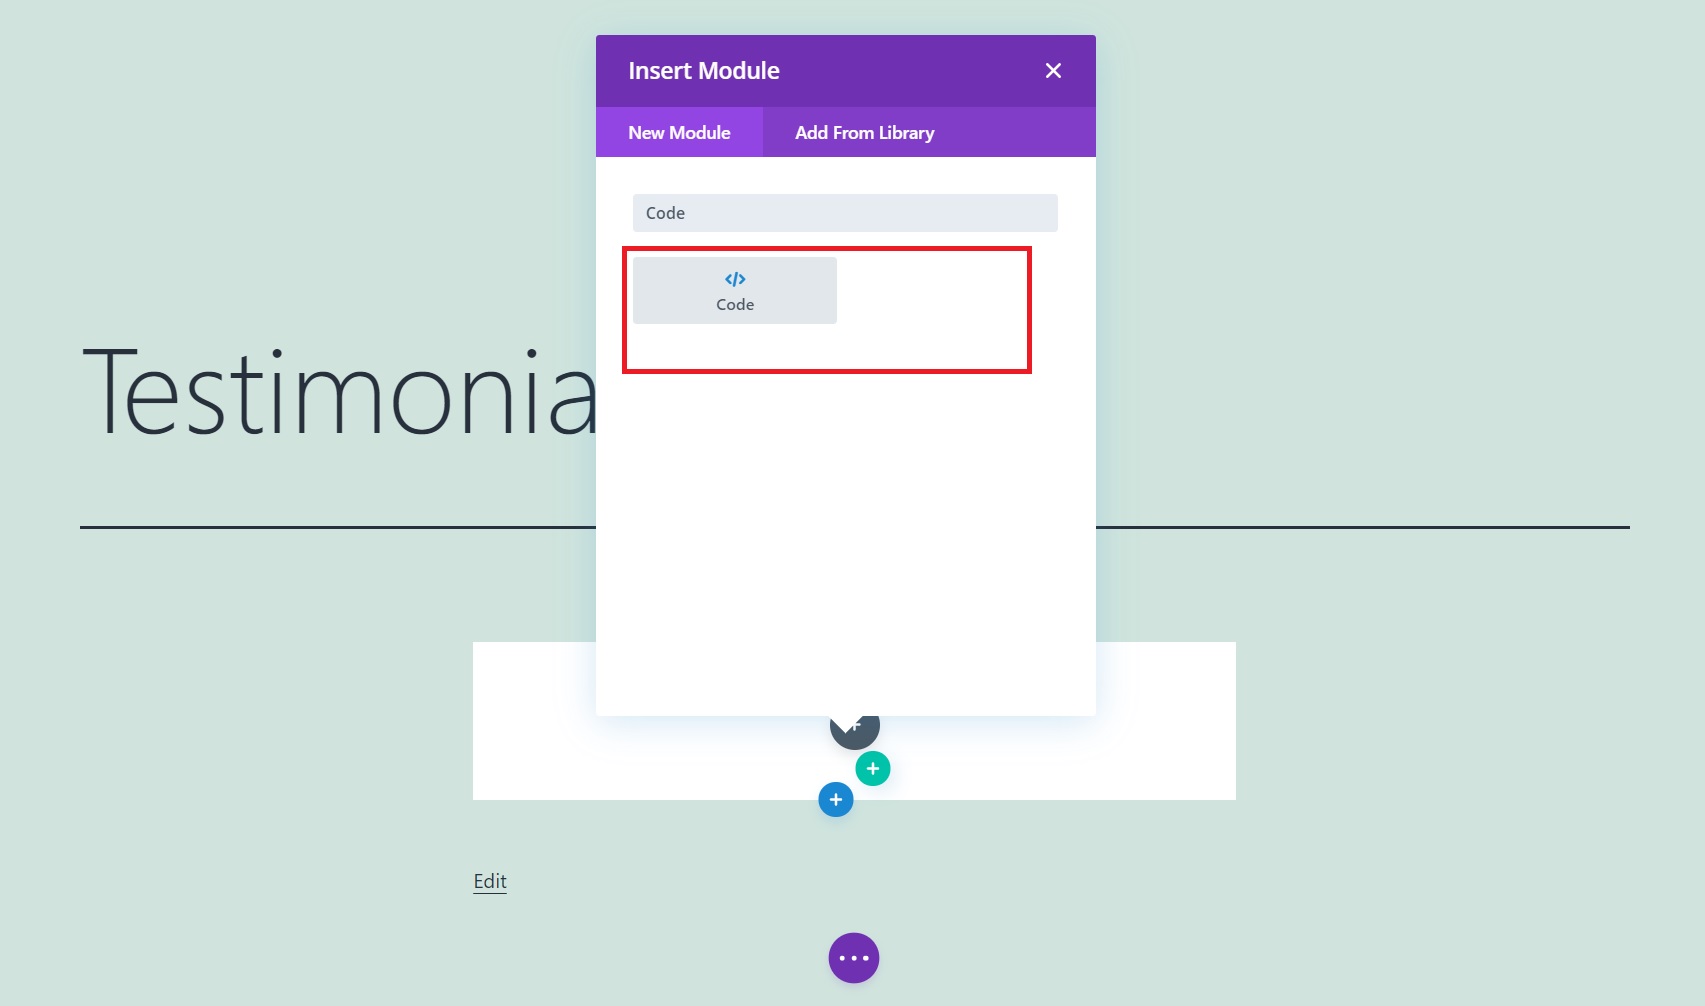
You have to click on it and paste the shortcode text in the window that opens:
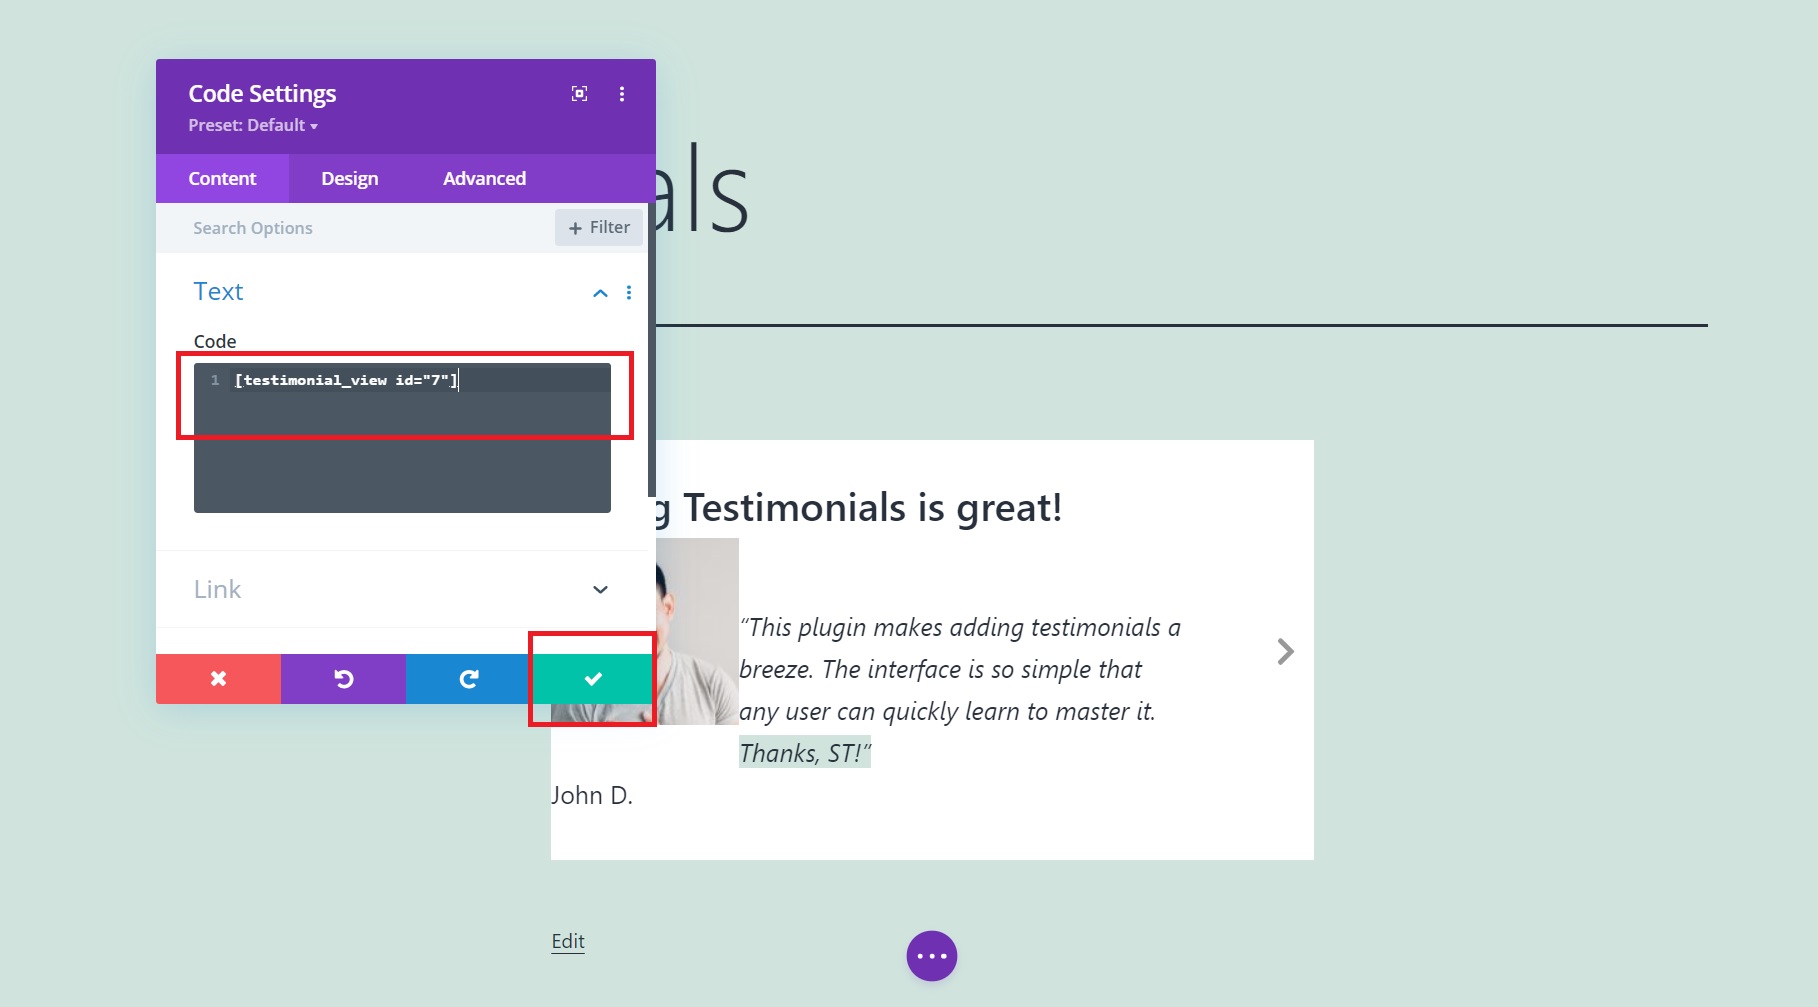
After that, click on the ✅ button and then the 3 dots in the purple circle to hit the Publish button.
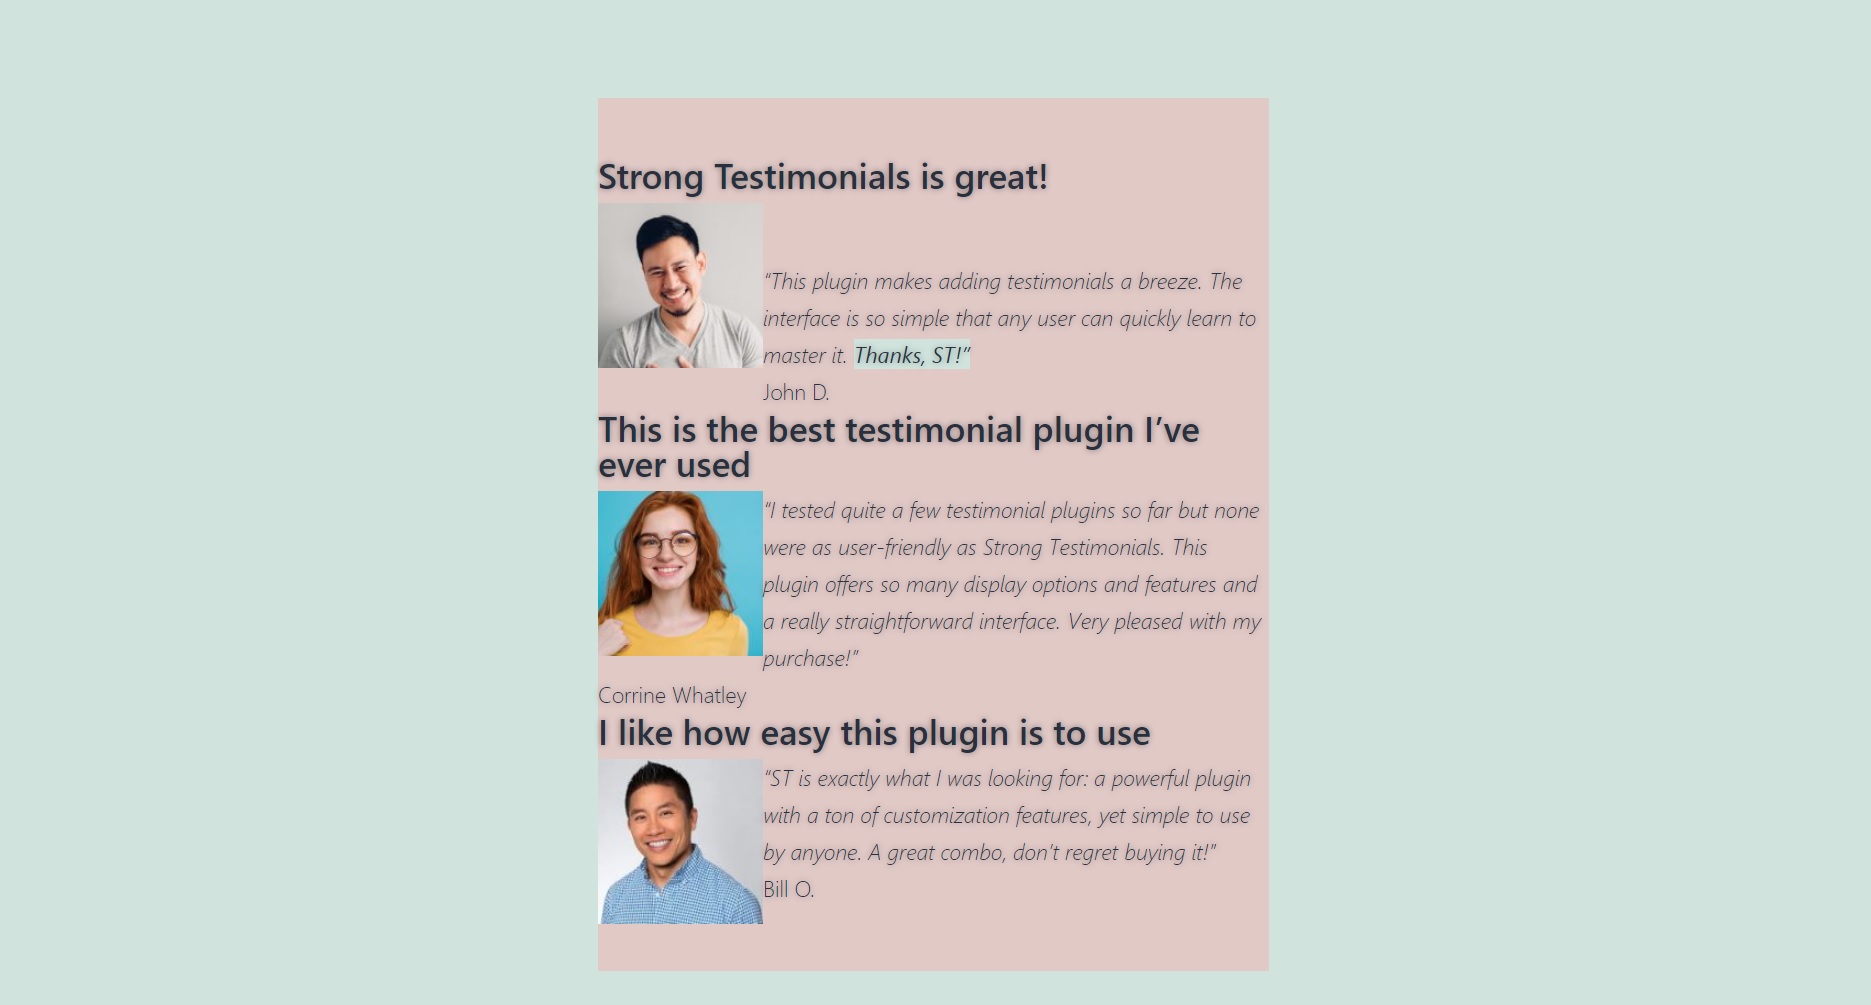
Here are two examples of testimonial pages created with Strong Testimonials and Divi:
And example number two:
So, what can I do using Strong Testimonials?
1. Save money – By making use of Strong Testimonials, you can add customer testimonials in 3 easy steps without the need to spend a lot of resources to get expensive packages just to use one simple feature. On top of that, it’s extremely user-friendly.
2. Easy import – Automate your extra testimonials by easily importing them from platforms such as Google, Yelp, or Facebook. Save a lot of time with just a few clicks instead of manually adding them one by one.
3. Infinite scroll – Save your website loading times by making use of the Infinite scroll extension. Have your customers load while they scroll for a better customer experience.
Conclusion
Strong Testimonials makes it very easy to add testimonials to your website, regardless of the page builder you are using (including Divi). You can also learn how to add testimonials in Beaver Builder and Elementor.
Customer testimonials add credibility to your business and increase your sales, so don’t waste any more time and start boosting your conversions now with Strong Testimonials! It doesn’t get easier than this 😁

Strong Testimonials Plugin
We’ve built the #1 WordPress plugin for collecting, managing, and displaying testimonials. Drive more sales by leveraging your existing user audience.