
If you’re reading this, then you’re using Elementor, and why ever not? It offers a fast, user-friendly way to build websites. Chances are you’ve used the testimonial widget available but feel it doesn’t cut the mustard.
If that’s the case, we will show you how to add more bling to your testimonials, make them stand out, and convert visitors into customers.
By the end of this article, you’ll have all the requisite knowledge to design a breathtaking testimonials page via Elementor that will leave your visitors in awe.
And let me tell you; it will be a hassle-free adventure. So, without further ado, let us delve straight into it! 👀
Table of contents
Unveiling the tools
As we strive to achieve our objective, partnering with Elementor and Strong Testimonials is a surefire way to get the job done. These epic tools provide us with everything we need to create a stunning testimonials page on our WordPress website. 🔥
Why use these tools? It’s time for an overview…
Elementor
Meet Elementor, the ultimate game-changer for WordPress users with no coding knowledge. With a simple drag-and-drop interface, this trendy page builder lets you personalize every aspect of your website, from headers and footers to content and menus.
What makes Elementor stand out is its pre-built templates, website designs, widgets, landing page builders, and motion effects, all of which can be tailored to your preferences. And the best part? Elementor integrates with third-party themes and plugins, making it a versatile tool.
Whether starting from scratch or revamping the existing website, Elementor is the perfect choice to help you achieve your website goals.
Also, you can get started with the free version; however, several templates, widgets, and features are restricted to the pro version, so check that out.
Strong Testimonials
Imagine effortlessly creating, collecting, managing, and customizing your testimonials and placing them anywhere on your WordPress website. You no longer have to fantasize about it because the Strong Testimonials plugin makes it a reality!
With over 100,000 active WordPress users, this plugin is a fan favorite for a reason. It’s the all-in-one solution for all your testimonial needs! You can create reviews directly from your WordPress dashboard, collect them from your users via a testimonial form, or import them from popular 3rd party platforms.
The plugin’s free version has exciting features that will blow your mind. But upgrading to a paid plan will unlock some great options that will make your website stand out like a unicorn in a sea of horses. 💃
So are you ready to give your testimonials a facelift with Strong Testimonials?? Trust us; it’s like having a personal testimonial genie in a bottle.

Strong Testimonials Plugin
We’ve built the #1 WordPress plugin for collecting, managing, and displaying testimonials. Drive more sales by leveraging your existing user audience.
Create a testimonials page in WordPress via Elementor and Strong Testimonials
Let’s get down to business and create an impressive testimonials page for your website. We have a few easy-to-follow steps for you, so you don’t need to worry about getting lost in the weeds. Let’s do this! 💪
Setting up the Elementor and Strong Testimonials plugin
It’s time to get your hands on Elementor and Strong Testimonials plugins, but before that, let’s install and activate both plugins.
Firstly, let’s tackle Elementor. Here’s how:
- Get yourself logged in to your WordPress dashboard. You know the drill, right?
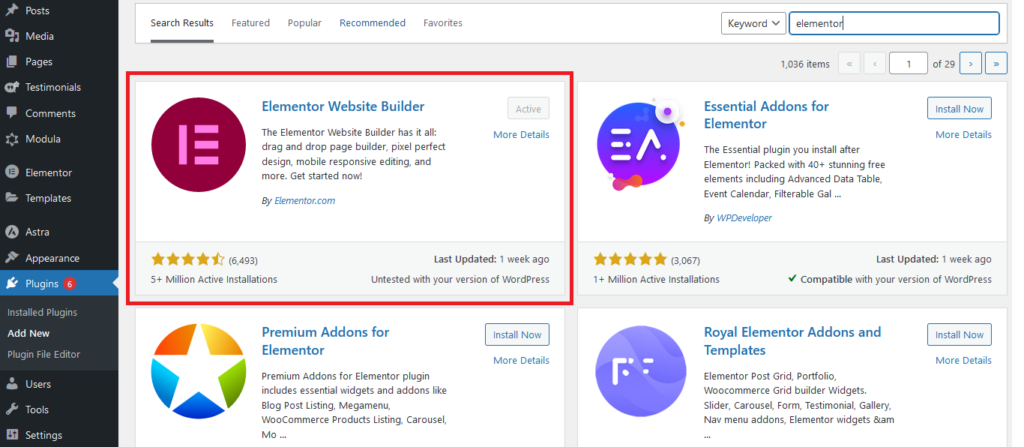
- On the left-hand panel, hover over the Plugins tab and click Add New from the submenu.
- Type “Elementor” into the search bar on the new page, and voila! The plugin should appear. Hit Install and let the magic happen.
- When the installation is complete, don’t forget to click Activate, and you’re all set to go!
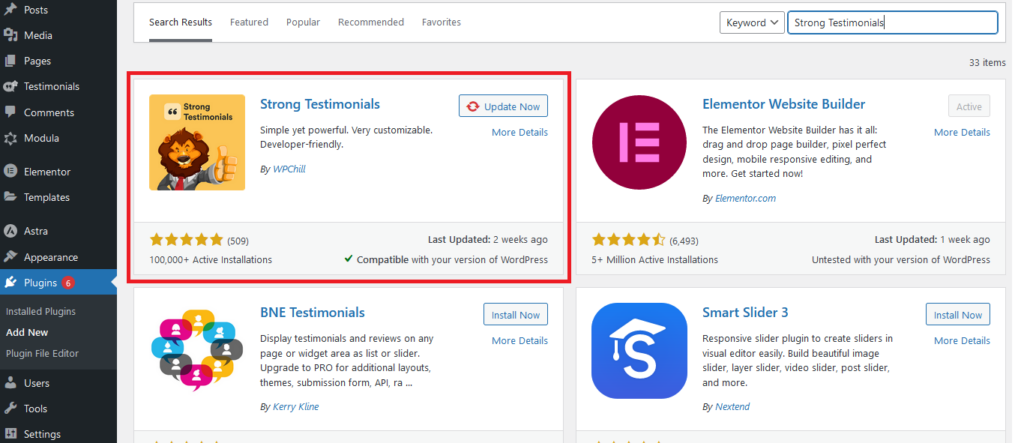
To activate Strong Testimonials, you can follow the same steps we did for Elementor, with a tiny change: you need to search for “Strong Testimonials” in the search bar. Once you find the plugin, go ahead and install and activate it.
Moreover, we will discuss some pro extensions of Strong Testimonials in this article; hence we recommend purchasing a pro plan and activating it.
Upon activating both plugins, ensure they are active by referring to the list of installed plugins.
Add testimonials to your WordPress website
It’s time to spruce up your website with some glowing testimonials. You have a couple of options: work with the existing testimonials already available under the All Testimonials, or you can also choose to manually add reviews that your customers sent you through other channels.
In Strong Testimonials, we can create, import or collect testimonials.
- To create a new testimonial, hover over the Testimonials tab and select Add New from the sub-menu. A new window will open with some fields (Add title, Content, Client details, etc.); fill them in with the appropriate information.
To give your testimonials some personality, you can embed content in the Content field from platforms like Youtube, Vimeo, and others with a Social Media Integration. It’s like adding a cherry on top of your ice cream sundae. Delicious! 🍒
Once done, hit the Publish button, and you have a new testimonial to brag about.
- Are you tired of typing out reviews by hand? Make your life easier with our Testimonial Importer. With this pro extension, you can easily import reviews from external platforms like Facebook, Google, and Yelp. That means no more copy-pasting or manually entering all those reviews. Nice.
And if you have your reviews in a CSV file, you can import them directly onto your WordPress website. Sweet!
- If you are looking for an effective way to gather customer feedback, there’s a third option you might find valuable! Why not construct a testimonial form which your customers can fill out directly? This way, you can gather their feedback in a structured and organized manner.
To create a testimonial form using Strong Testimonials, navigate to the Testimonials tab and locate the Form option. Upon clicking this, you’ll get redirected to a new page where you’ll find an array of fields to work with.
You can customize the form to make it look how you want it to. Also, you can allow direct publishing or pending status for you to review and approve/reject the incoming testimonials. Once done, save the changes.
Create a View
Next up, you must create and assign a view to the testimonials. For that, select Views, and hit the Add New option. This action will redirect you to a new page, presenting you with three different modes.
You can choose between the Display mode or Slideshow mode for displaying testimonials. On the other hand, if you aim to provide your users with the option to submit their feedback through a form, you will need to construct a view in the Form mode.
Carefully check the available options under each of these modes, as they can be instrumental in building a testimonial page that suits your preferences.
Well, we also want to have some page-building fun! And for that, we will create a Testimonial page. First, we have a few reviews already listed under the All Testimonials and have chosen the Display mode as the view for publishing. Let’s play around with the options.
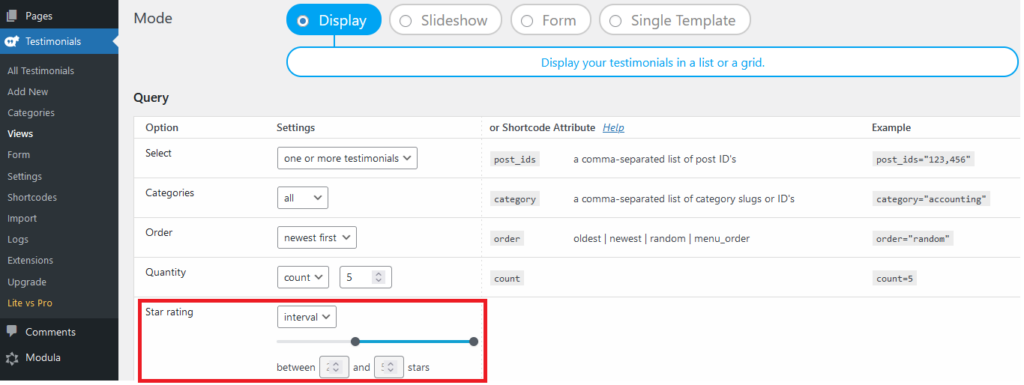
Query
| Option | Choice | Summary |
| Select | One or more testimonials | Want to publish all and not specific testimonials |
| Categories | All | Want to select all and not specific categories |
| Order | Newest First | Prioritize the display of the latest reviews at the top |
| Quantity | Count – 3 | Restrict to publishing up to three reviews only |
Fields
| Option | Choice | Summary |
| Title | None | Do not redirect when someone clicks the title |
| Featured Image | Thumbnail | Include a thumbnail preview of the featured image |
| Content | Entire content | Present a full preview without cutting any part of the review |
| Custom Fields | +Star rating | Want to add star ratings along with the existing fields |
Extra
| Option | Choice | Summary |
| Add Pagination | Checked – 5 | Display five posts per page |
| “Read more” to a page or post | Unchecked | Display complete details rather than adding a redirect for “Read more.” |
If you’d prefer to keep your testimonials in one place, guess what? You can! Instead of dividing them across multiple pages, you can create a seamless experience with the Infinite Scroll Option.
Style
| Option | Choice | Summary |
| Template | Modern | Publish the testimonials with a modern template |
| Layout | Grid | Arrange testimonials in a grid-like arrangement |
| Background | Single Color | Want a unique toned background |
| Font Color | Inherit from theme | Keep it adjacent to the theme style |
Suppose you want to get fancy with your testimonials and explore additional options, like Reorder fields or cherry-picking only the crème de la crème of reviews by taking out the lower-ranked ones. You can get that with Advanced Views (pro extension alert!!).
On saving the changes, you’ll have a shiny new shortcode ready to publish your testimonials.
Elementor into the action
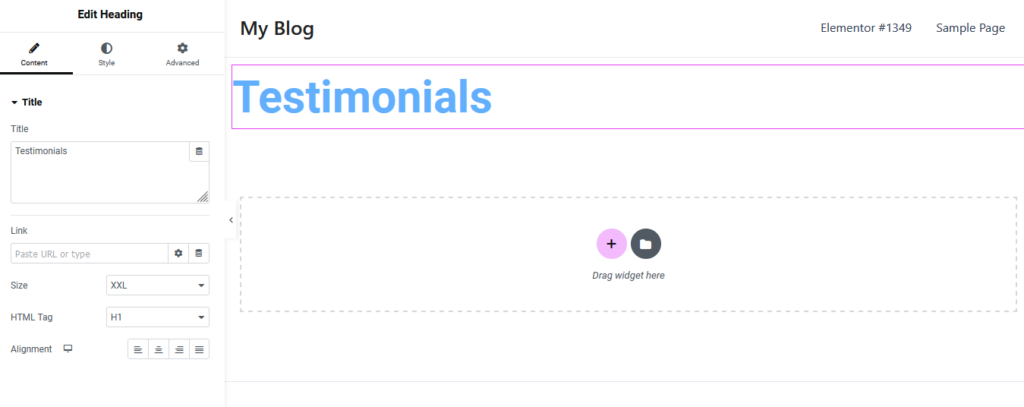
Now, it’s time to bring in the big gun – Elementor! You can create a new page or go to an existing one and select “Edit with Elementor” from the top-bar menu.
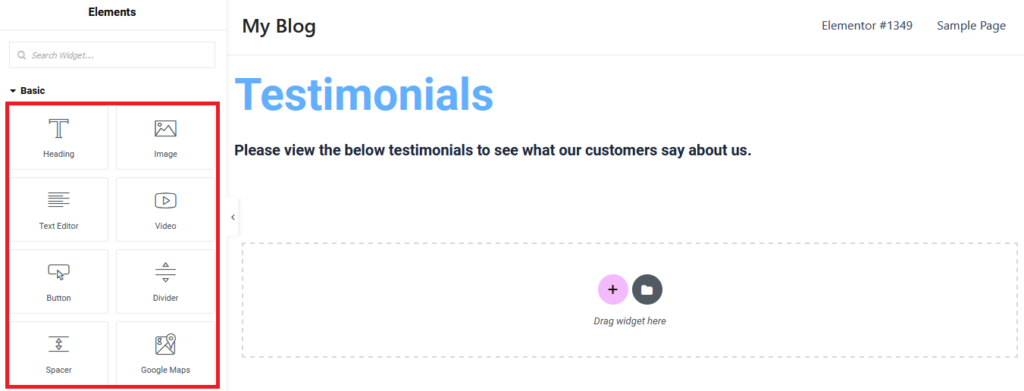
Elementor offers pre-build page templates and widgets that you can choose with a few clicks. Adding a captivating headline to your webpage is a breeze with Elementor. Steer to the widget menu, select the “Heading” option, and drag and drop it to your desired location. Once the widget appears on the page, enter the heading title and save it.
But wait, there’s more! Elementor also offers a seamless way to incorporate text into your page. Search for the “Text Editor” in the Search Widget. Locate the widget and then drag and drop it anywhere you like, allowing you to quickly add as much information about your testimonials as possible.
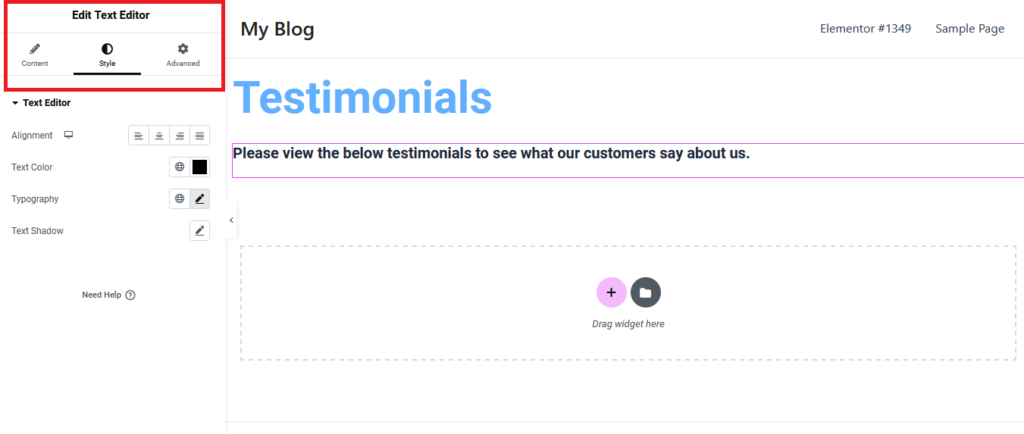
You can also choose to edit the style of these widgets. In the case of Text Editor, you can adjust the alignment, add a text color of your choice, introduce typography, or add a shadow. Also, you can make some layout changes from the Advanced tab.
The options are limitless when building your web page with Elementor. There are countless widgets, from images and videos to buttons and icons. The only limit is your creativity!
To ensure that your testimonials will be front and center for all the world to see, search for the shortcode in the widget field, and place it wherever you like. Then, enter your shortcode in the provided field and apply the changes, allowing you to preview how your testimonials page will appear to your audience.
Is there scope for improvement in the style or any other aspect of your testimonials? No need to worry! You can easily make changes directly from the dashboard from the View option in the Testimonials tab and preview them in real-time.
This way, you can fine-tune the appearance and content of your testimonials until you achieve the desired outcome.
And that’s it. Your page is ready to get published.
But wait, I bet you don’t want to stop here.
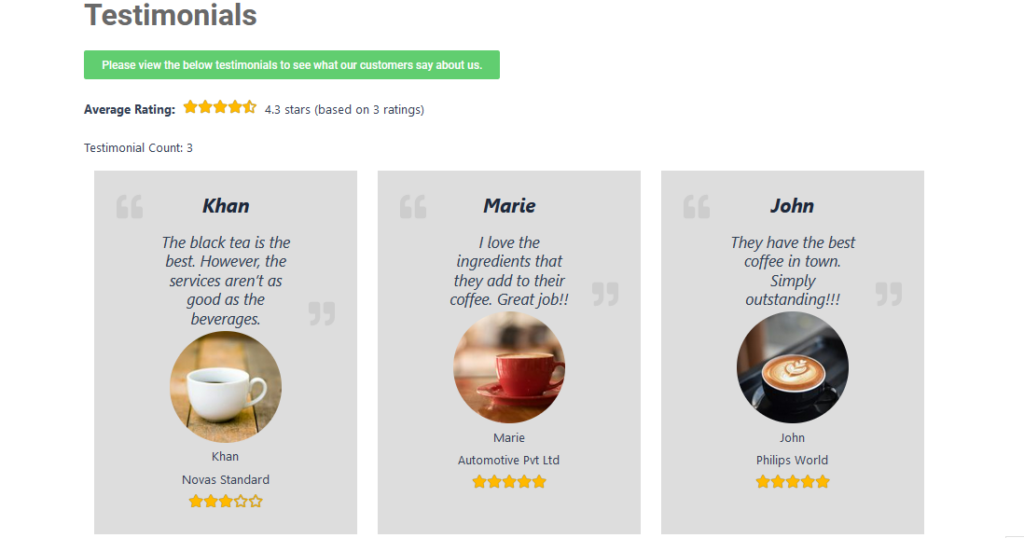
If you want to add some details like Average rating, Total testimonials count, or something similar along those lines, be sure to take a peek at the list of shortcodes that can be added to spice things up further.
In the below image, you can see that we have added a couple of shortcodes (Average rating, Testimonial count) to brighten up our page with more relevant details.
If you are a savvy coder, there’s no reason you shouldn’t make custom changes. Check out our knowledge base articles to learn more: Custom CSS or Additional CSS.
And after displaying all those great reviews, why not take it further and encourage your clients to leave even more feedback? Create a form, assign a view, copy the generated shortcode, and paste it into the Elementor’s shortcode widget, and bang!!

Time to call it a day
We’ve reached the end of the road. Before we part ways, we leave you with some final remarks. If you want to make a big splash and establish a powerful online presence, create a killer testimonial page on your WordPress website.
And to make that happen, there’s no better combo than Elementor and Strong Testimonials. Seriously, folks, they’re like peanut butter and jelly, cookies and milk, or Batman and Robin. They go together perfectly. 💕
By following the steps we’ve outlined in this guide, you’ll be able to design a visually stunning and highly effective testimonial page that will make your customers’ feedback shine. Just remember to keep it simple, choose impactful testimonials, and make sure your page is easy to navigate.
And hey, remember to try Strong Testimonials! Plenty of secrets remain left to uncover, and you never know what kind of magic you might discover. 🪄
Strong Testimonials Plugin
We’ve built the #1 WordPress plugin for collecting, managing, and displaying testimonials. Drive more sales by leveraging your existing user audience.