👋 Hey there! Are you struggling to manage customer feedback? Don’t worry; you’re not alone! As a business owner, you understand the importance of customer feedback.
But what do you do when you have a ton of feedback to organize or multiple products to manage? That’s where the Strong Testimonials plugin comes in!
In this article, I’ll show you how to use this plugin to streamline your feedback management and make your life easier. Let’s get started!
Table of contents
Reviews, whether positive or negative, are critical to the success of any business. This fact is supported by recent statistics, which demonstrate the importance of customer feedback:
- Nearly 89% of shoppers worldwide read product reviews before making a purchase.
- On average, buyers read 40 reviews before they trust a company’s star rating.
- Consumers who actively seek out negative reviews lead to a 67% increase in conversion rates for the business compared to those who do not.
Listen up, folks! If you want to keep your customers happy and your business booming, listen to what they say. And lucky for you, Strong Testimonials make it easy-peasy to collect and manage all that valuable feedback.
Plus, with the Business pricing plan, you’ll have access to all the sweet features that’ll take your testimonials to the next level. So what are you waiting for? Let’s get that feedback flowing! 🚀

Strong Testimonials Plugin
We’ve built the #1 WordPress plugin for collecting, managing, and displaying testimonials. Drive more sales by leveraging your existing user audience.
Setting up Strong Testimonials
The Strong Testimonials plugin offers a simple and effective way to showcase customer feedback and testimonials on your website. Installing, activating, and configuring it is a straightforward process that can be done in just a few simple steps.
Installing and Activating the Plugin
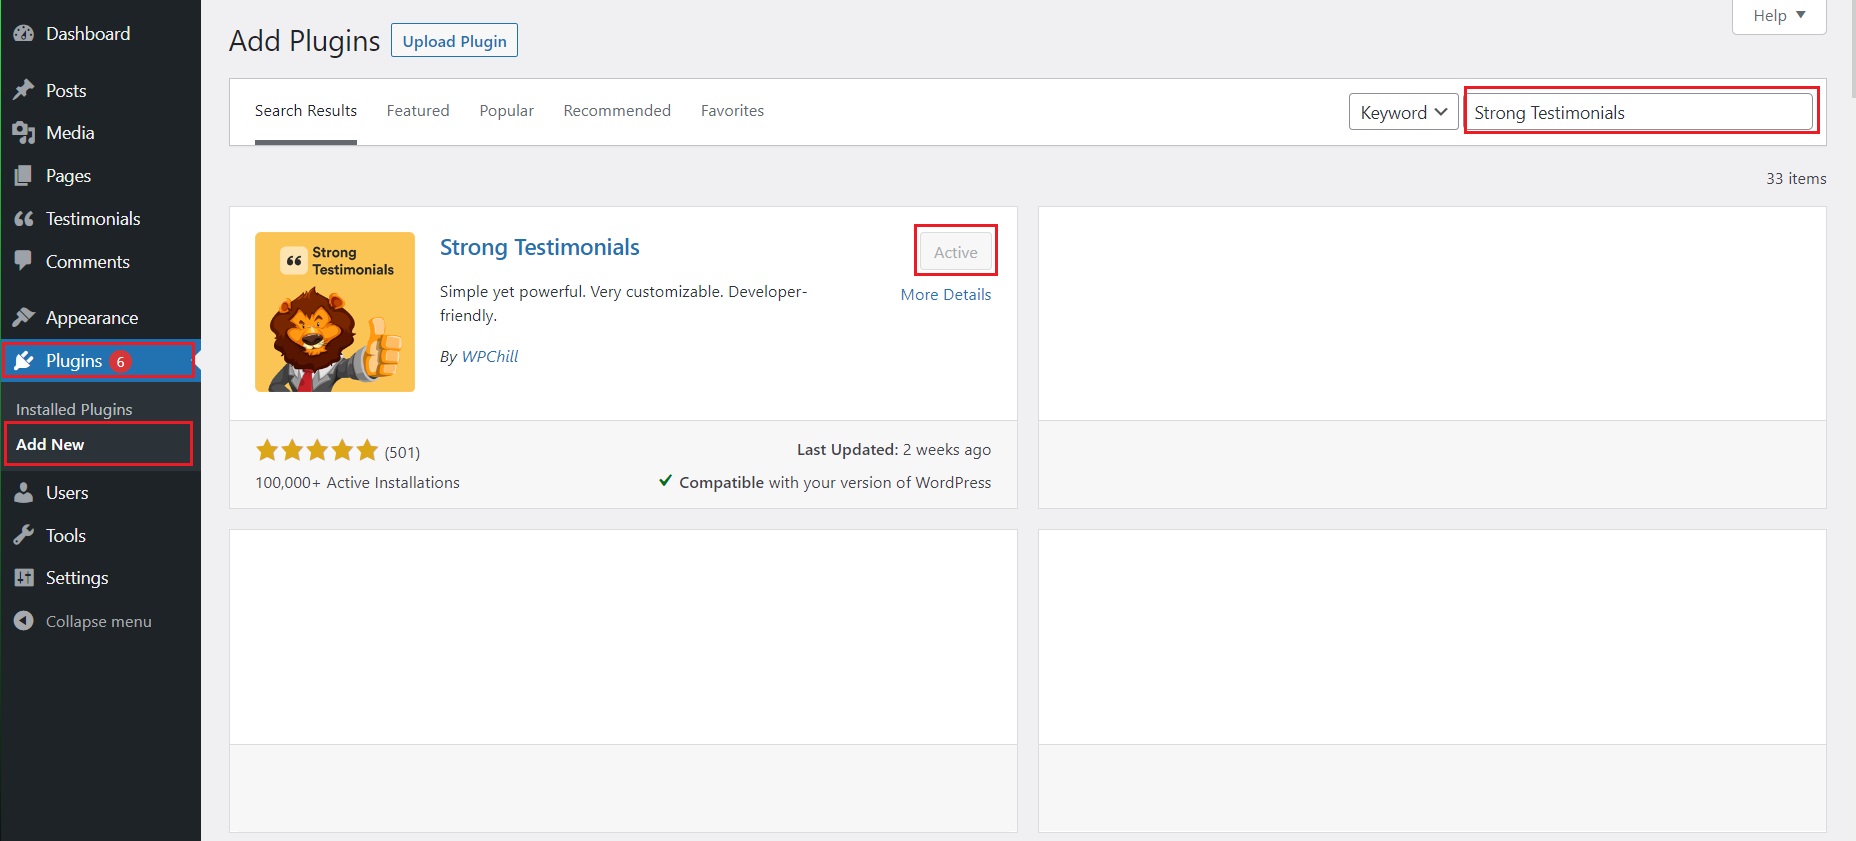
Installing and activating both Strong Testimonials’ free and pro versions is straightforward. To install Strong Testimonials, go to your WordPress Dashboard > Plugins > Add New.
You’ll be redirected to a page with all free plugins. In the search bar in the upper right corner, type Strong Testimonials. Once you see it, click Install Now.
For more information and screenshots on how to install and activate Strong Testimonials, make sure to check our documentation.
If you plan on upgrading to the pro version, we also have a comprehensive guide on how to activate the pro version.
Creating New Testimonials
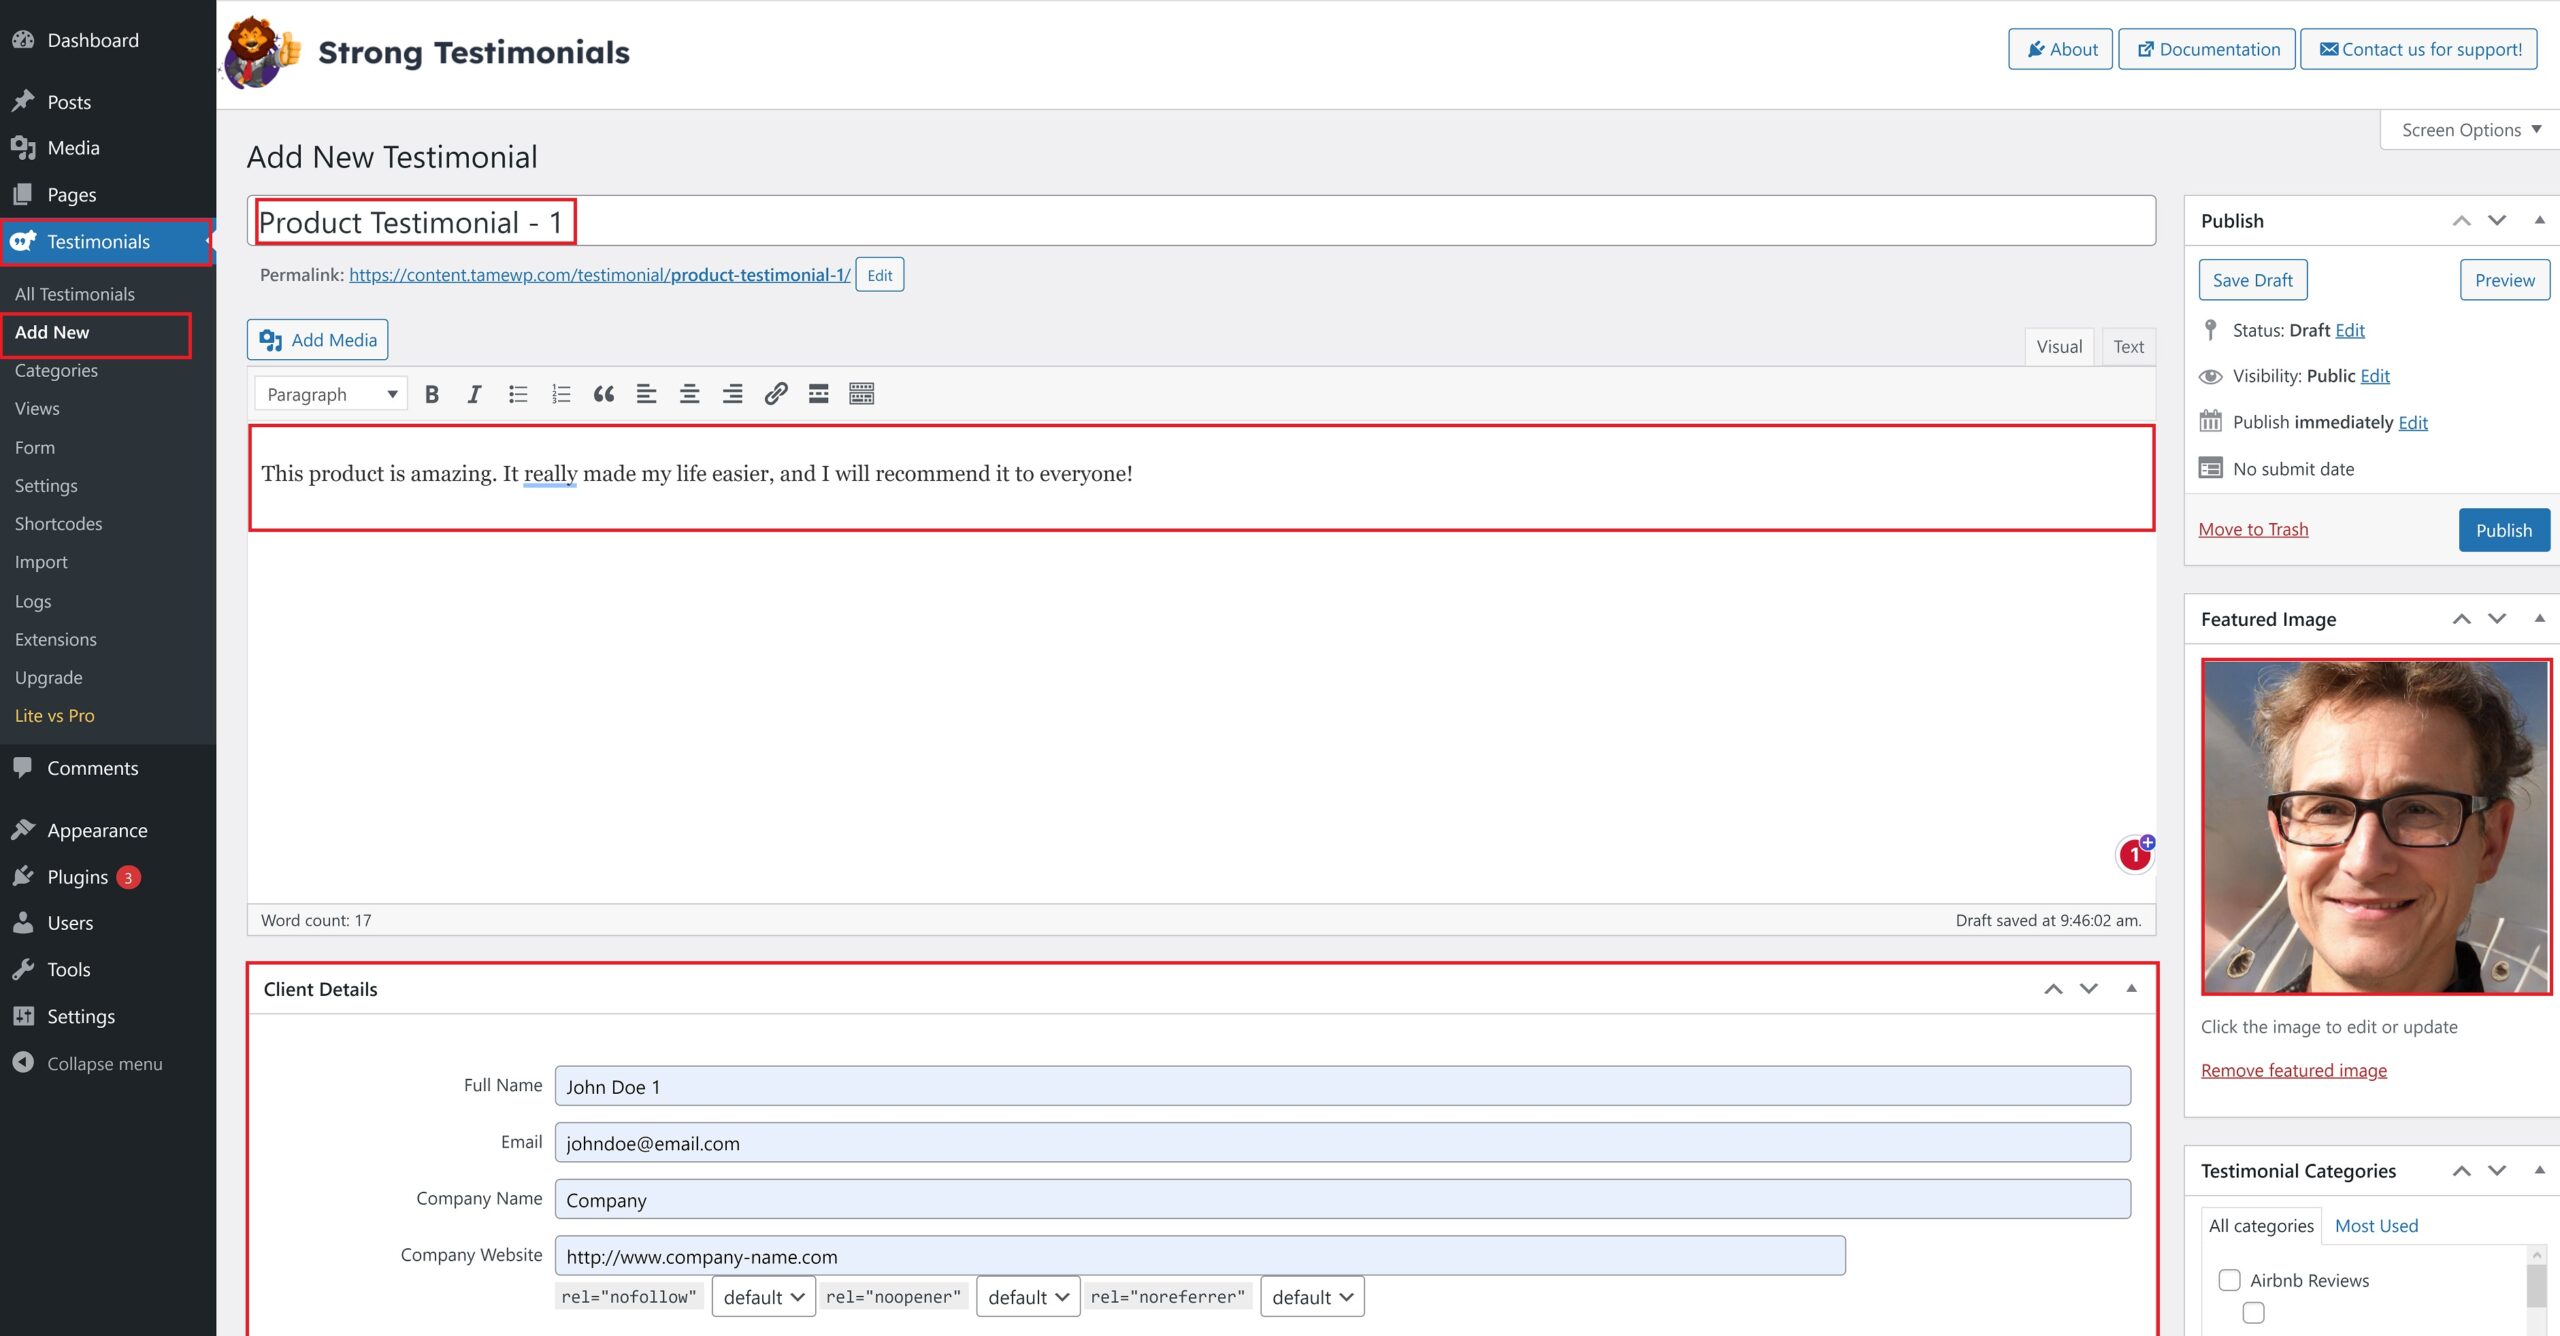
After you’ve installed and activated Strong Testimonials, you can create new testimonials by going to the Testimonials section in your WordPress dashboard.
You can add new testimonials from there by clicking “Add New.” You can enter the testimonial text, add a photo of the person who provided the testimonial and select any other options you want to include.
For more information and a step-by-step guide on creating new testimonials, check out our knowledgebase guide.
Suppose you don’t want to add testimonials one by one manually. In that case, our plugin also lets you import from 3rd party sites/plugins like Facebook, Google, Yelp, Zomato & Woocommerce, and more with the help of the Strong Testimonials Importer extension.
Organizing customer feedback
Strong Testimonials offers several features that can help you effectively organize customer feedback. Here are some of the key features:
Categories
One of the best ways to organize your testimonials is to assign them to various categories.
To create a category, head to your Dashboard > Testimonials > Categories.
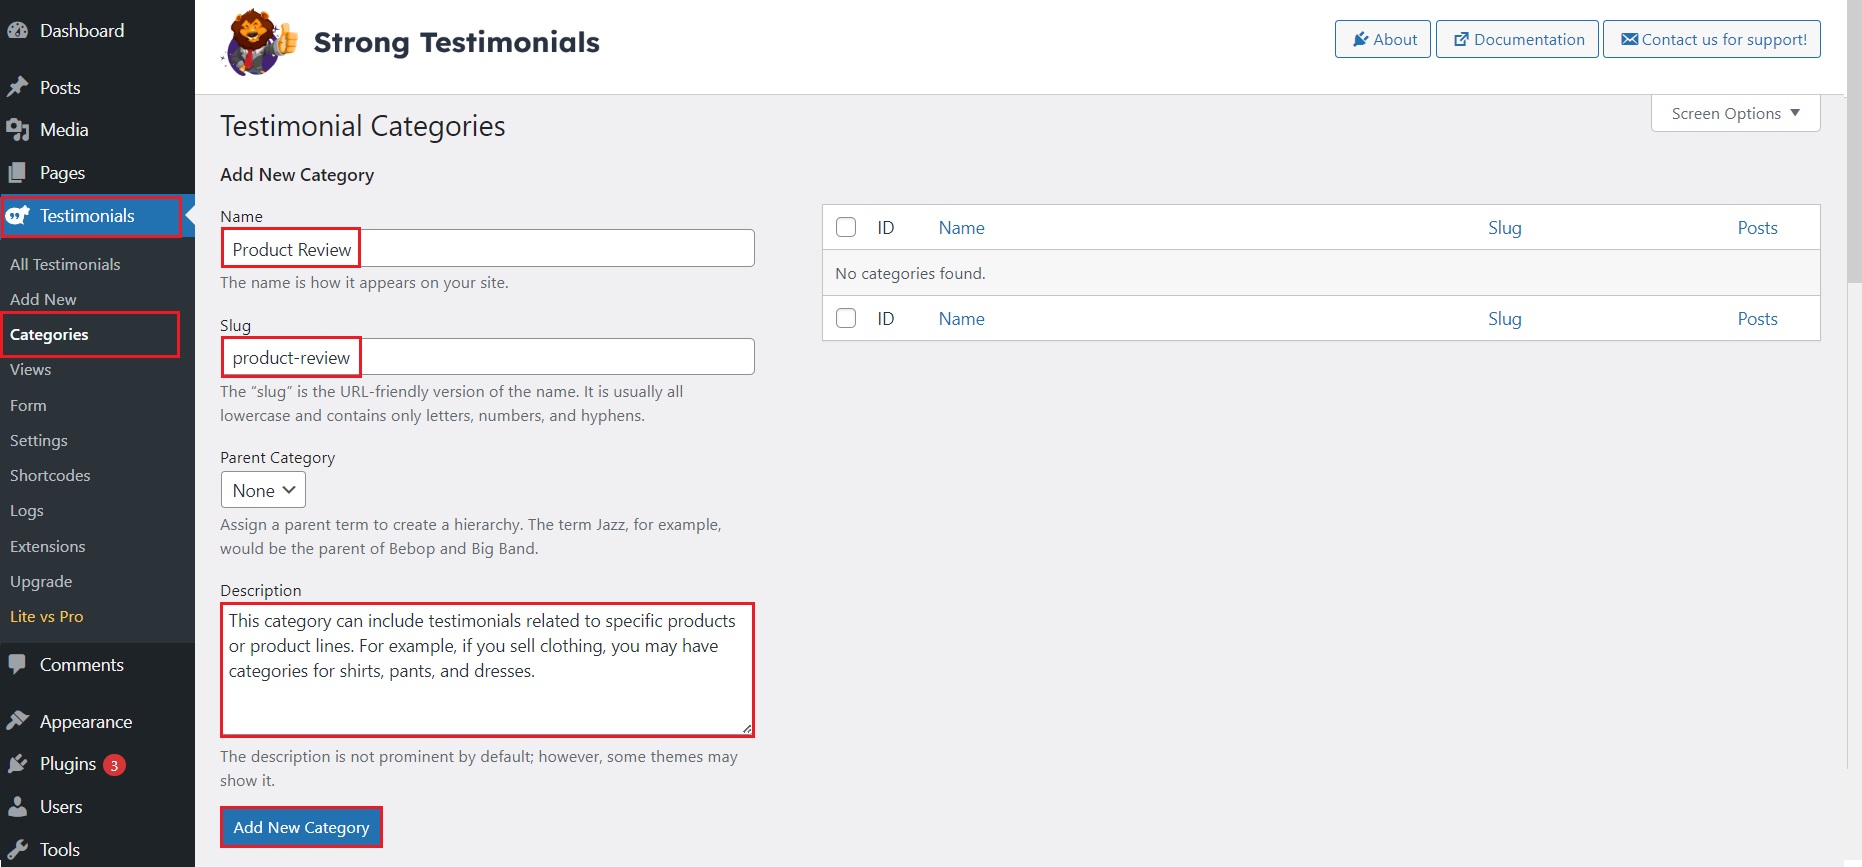
You will have to fill in the category’s name, slug, and description. Once you are done, click on the Add New Category button.
Some examples of testimonial categories may include:
- Product Reviews
- Service Reviews
- Customer Support Feedback
- Sales Feedback
- Industry-specific Feedback
- Testimonials by Customer Type
Remember, the categories you create will depend on your business and the types of feedback you want to collect. It’s essential to think carefully about categories. They will help you organize and manage your customer feedback.
To assign a category to a testimonial, head over to Dashboard > Testimonials > All Testimonials and select the testimonial to which you want to assign a category.
On the right side, you will find a section called Testimonial Categories. Tick the category that best fits with the testimonial.
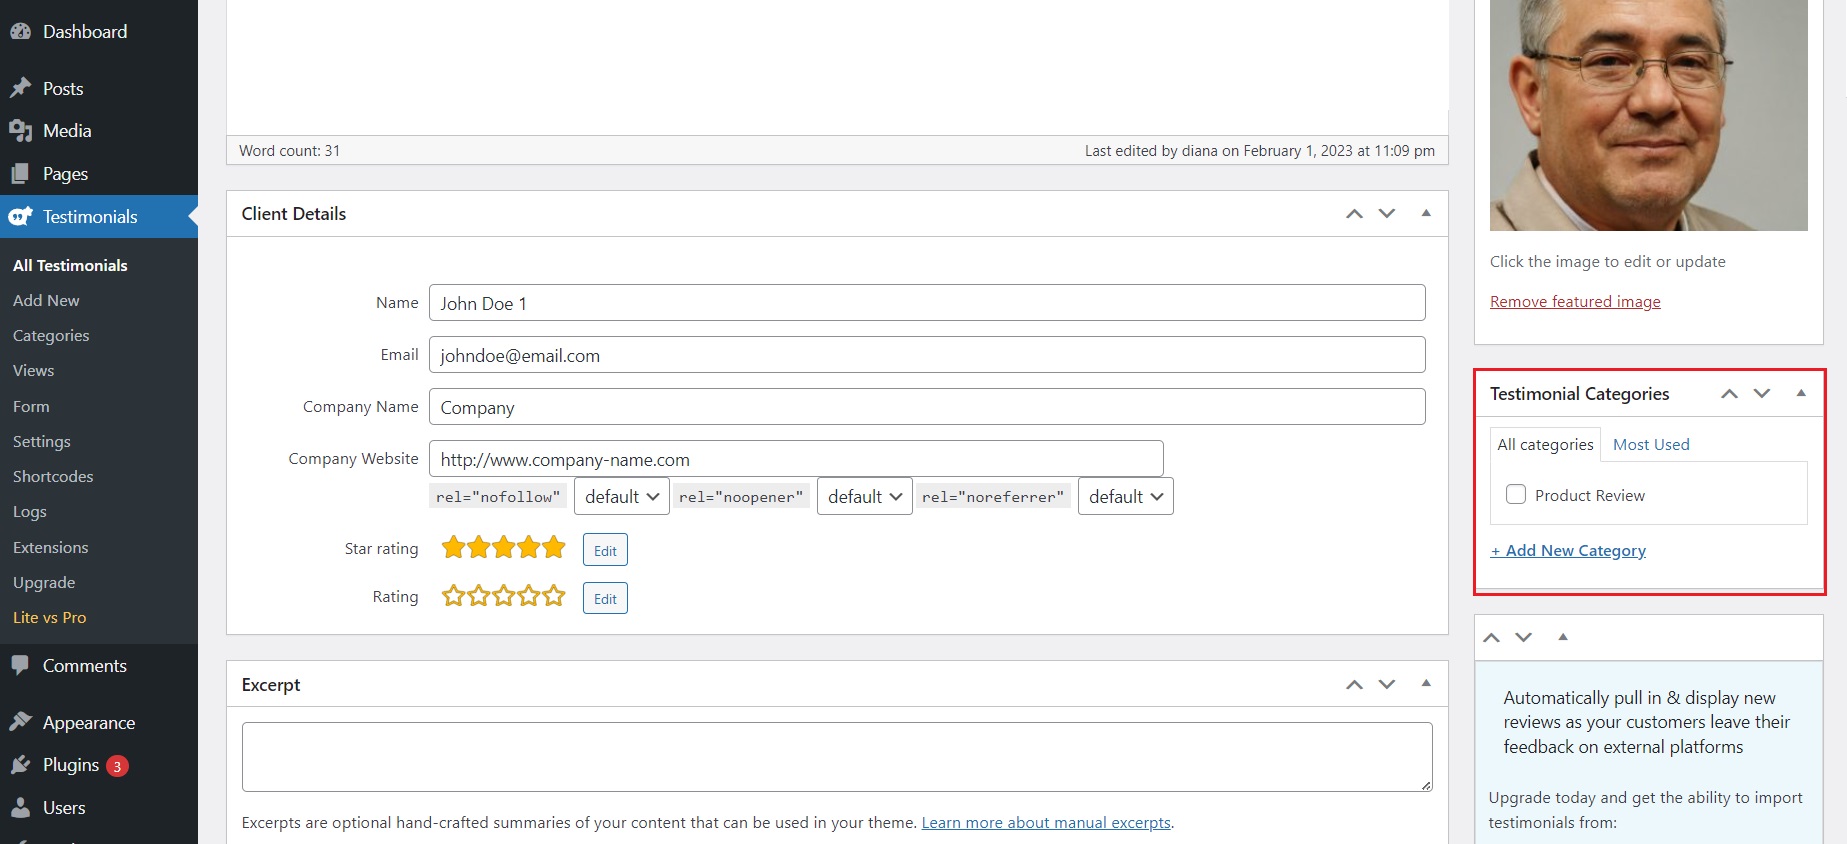
In that section, you can also quickly create new categories. Just click the Add New Category link and give it a name in the text box. Easy peasy lemon squeezy, right?
And if you’re feeling extra organized, you can assign parent categories and branch them out like a family tree. Who knew managing categories could be so much fun?
Filtering
To access various filtering options, you must install the Strong Testimonials Filters extension. The extension comes with the Business pricing plan.
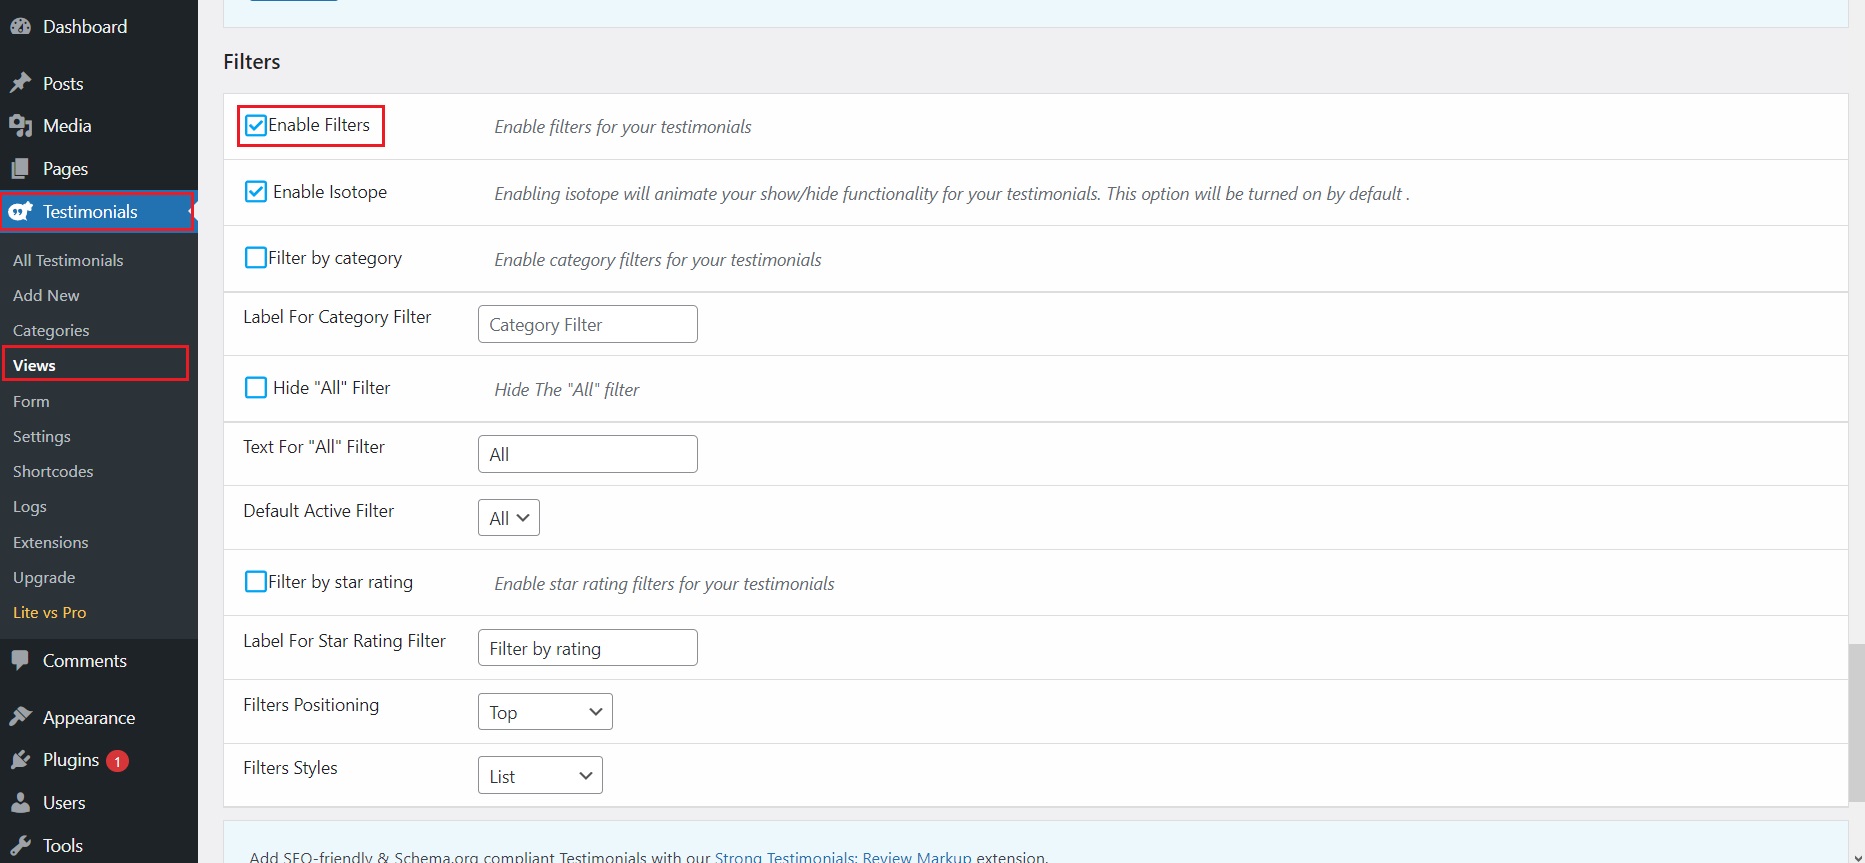
With numerous options available, you may be wondering about their purpose. Fear not; we’re here to provide a breakdown of each one!
Isotope
By default, this setting is already turned on, and we suggest keeping it that way to enhance the overall user experience on your website. We recommend leaving this option enabled as it creates a smooth transition effect when switching between categories.
Filter Testimonials by category
If you have a business with many product types and positive customer feedback, having dozens of testimonials from different products on one page can be overwhelming.
To make it easier for you and your clients, you can enable the “Filter by category” option and label each type to make it easier to navigate the website interface.
This way, your clients can easily find the reviews for the specific product they want, increasing their satisfaction.
The “All” Filter
After categorizing your testimonials, visitors should read feedback about your business, products, or brand in general. Adding an “All” button allows them to access all testimonials easily. You can customize the name of this button to make it more appealing.
Filter by star rating
To maintain a positive image of your business, you may display only testimonials with five stars. This way, you encourage potential customers to purchase by showcasing the best feedback.
Although showcasing positive testimonials is important, it’s also recommended to include some negative ones and respond to them appropriately.
This demonstrates to potential customers that your business cares about addressing and resolving any issues that may arise.
Which, believe it or not, people do look for. If you showcase too many overwhelmingly positive testimonials, people could see that as a red flag!

Changing the order in which they are displayed in a view
In this section, we’ll delve into the various display order options available to you and discuss scenarios in which each may be most beneficial.
You can easily change the order by going to your WordPress dashboard > Testimonials > Views > edit your View > Query > Order.
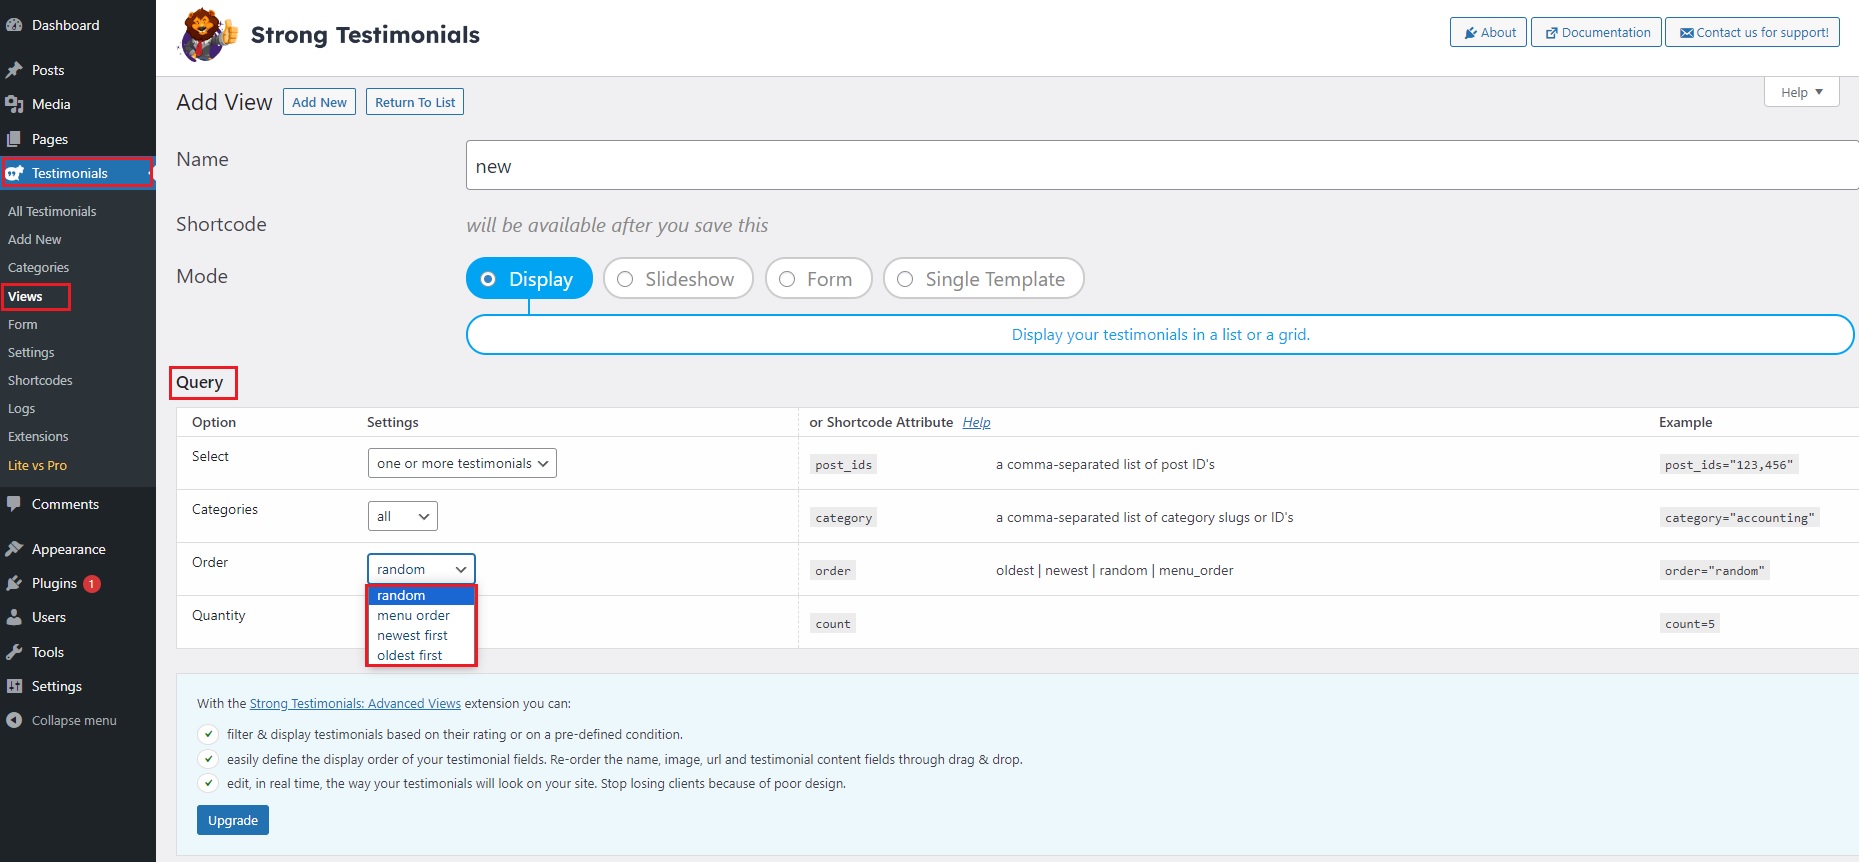
There are four options available: random, menu order, newest first, oldest first. Let’s explore them individually.
🟢Random Order
Random order is an option that adds an element of surprise and freshness to your website. When you select this display order for your testimonials, they will be shuffled and displayed in a different sequence every time a user accesses your site or loads a page. This option is ideal when:
- You want to keep your website engaging and prevent it from appearing static.
- All testimonials are equally valuable, and you don’t want to prioritize any particular one.
- You’re aiming to capture the attention of returning visitors with a new experience each time they visit your site.
Imagine a restaurant website where customer reviews are displayed in random order. This approach could keep diners intrigued as they discover new positive experiences with each visit.
🟢Menu Order
The menu order option is all about maintaining control over the sequence in which testimonials are displayed. Testimonials will appear in the same order they were arranged in your WordPress dashboard under “Testimonials > All testimonials.” This option is suitable when:
- You have specific testimonials that you want to showcase prominently.
- You want to tell a coherent story or highlight a journey through your customers’ experiences.
- You need to ensure that older testimonials are always at the beginning, creating a historical narrative.
Consider an e-commerce website that wants to highlight a series of testimonials that showcase the evolution of their product. Using menu order, they can ensure that the testimonials are presented in a carefully curated sequence that tells a compelling story.
🟢Newest First
Displaying testimonials in newest first order is often chosen to emphasize the latest feedback or endorsements. In this arrangement, the most recent testimonials will always appear at the top. This approach is beneficial when:
- You want to demonstrate your company’s ongoing success and relevance.
- You frequently receive positive feedback and want to highlight the latest customer experiences.
- You want to assure visitors that your business is continuously improving and receiving positive reviews.
Think of a tech blog where readers are interested in the most recent product reviews and updates. Displaying testimonials in “newest first” order ensures that the latest feedback is the first thing they see.
🟢Oldest First
Conversely, the oldest first display order keeps the historical context intact. The earliest testimonials are given prominence at the top of the list. This option is advantageous when:
- You want to highlight the longstanding credibility and history of your business.
- Your earliest customers’ experiences hold a special significance or represent a milestone.
- You aim to show the journey and evolution of your business over time.
For a business celebrating a significant anniversary or milestone, showcasing testimonials in “oldest first” order can serve as a powerful reminder of the enduring trust and loyalty your brand has garnered.
Tips for effectively organizing and managing customer feedback using the plugin
Customer feedback is the secret sauce that can help any business flourish. And with the Strong Testimonials plugin, collecting and managing feedback has never been easier.
Ready for some extra tips on how to sort and manage customer feedback like a boss? Keep reading!
✔️ Determine the types of feedback you want to collect and categorize them accordingly
As we previously stated, it’s crucial to determine the type of feedback you want before gathering customer feedback.
You can collect feedback about a specific product or service or your customer service overall.
Once you’ve decided, you can create categories for each type of feedback to organize and find them easily later on. You may categorize by “Product Reviews,” “Service Reviews,” “Customer Support Feedback,” or even by location if you have different franchise locations.
✔️ Create custom fields to collect additional information about your customers
With the Strong Testimonials plugin, you can add custom fields to your feedback form to gather more customer information. This information can help you better understand their needs and improve your products or services.
Moreover, showing extra information about your customers who left a review can enhance your brand credibility and build trust with future buyers.
✔️ Regularly review and update your feedback categories to keep them organized and relevant
As your business grows and changes, you might have to update your feedback categories to keep up with the changes in your products or services.
For instance, if you introduce a new product line, you may need to create a new category for it. Similarly, if you offer a new service, you might need to create a new category for that too.
Reviewing and updating your feedback categories on a regular basis will ensure that your feedback is always well-organized and easy to access.
Displaying customer feedback on your website
Once you’ve collected and organized your customer feedback using Strong Testimonials, you’ll want to display it on your website in a visually appealing and easy-to-navigate way.
The plugin provides several options for displaying customer feedback on your website, and here are some of the most common ways:
- Display: This display format shows a list or a grid of testimonials on your website, with options to filter by category or star rating. The display view is a great way to showcase many testimonials in an organized and visually appealing way.
- Slideshow: This display format shows testimonials in a slider format, with options to customize the slider speed and transition. The slider is a great way to highlight a smaller number of testimonials in a visually striking way.
Both views can be fully customized to match your website’s style and displayed on any page or post using a shortcode. Once you save the changes, a shortcode will show up under the testimonial view name.
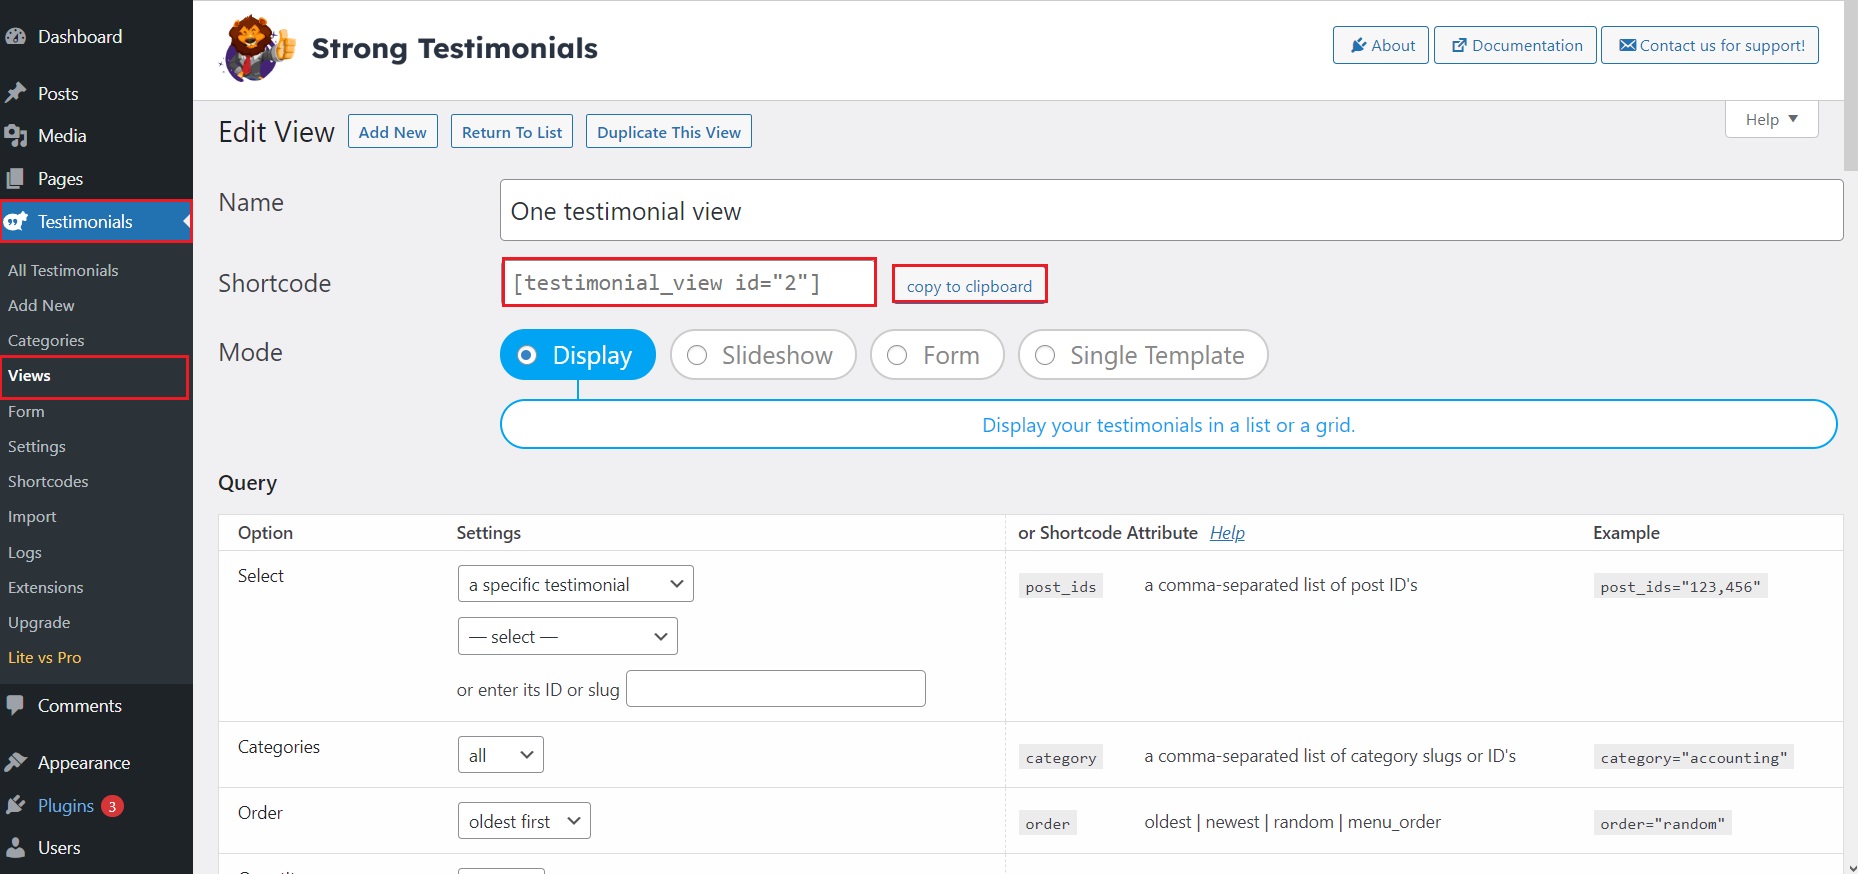
Copy the shortcode and head to the page or post you want to display your testimonials. Paste the shortcode in the shortcode block and hit publish or update. Your testimonials should be live and kicking!
Best practices for displaying customer feedback on your website
To make your customer feedback more effective on your website, there are several things you should consider:
- Choose a display format that suits your website design and layout. The display format should be easy to read, visually appealing, and match the overall design aesthetic of your website.
- Use high-quality images of your customers or products to make the testimonials more engaging. Images can help bring the testimonials to life and make them more relatable to visitors.
- Include a mix of different types of feedback, such as product reviews, customer service feedback, and user experience feedback. This will help to provide a well-rounded view of your business and its offerings.
- Regularly update your testimonials to keep them fresh and relevant. Old and outdated testimonials can give visitors a negative impression and diminish the value of your feedback.
Wrapping up…
Well, folks, we’ve reached the end of our journey to organize and display customer feedback. It can be a hectic and daunting task, but fear not! With the Strong Testimonials plugin, you can take charge of your customer feedback and become a master organizer.
By categorizing, filtering, and visually displaying your feedback, you can make informed decisions, gain customer trust, and even boost sales.
So what are you waiting for? Give Strong Testimonials a try and see how easy and fun organizing feedback can be.
Strong Testimonials Plugin
We’ve built the #1 WordPress plugin for collecting, managing, and displaying testimonials. Drive more sales by leveraging your existing user audience.